ברוכים הבאים ל-NETO

כניסה לחשבון הקיים, או הרשמה מהירה תוך דקה.

כבר רשומים?לקוחות קיימים
חדשים? הרשמהבחרו את המסלול מעסיק עובד / פרילנסר

דברו איתנו

בחרו איך נוח לכם · אנחנו כאן בשבילכם.

מידע, מדיניות ומסמכים

הכול על NETO · שקוף וזמין

NETO · ברקת אי.טי בע״מ
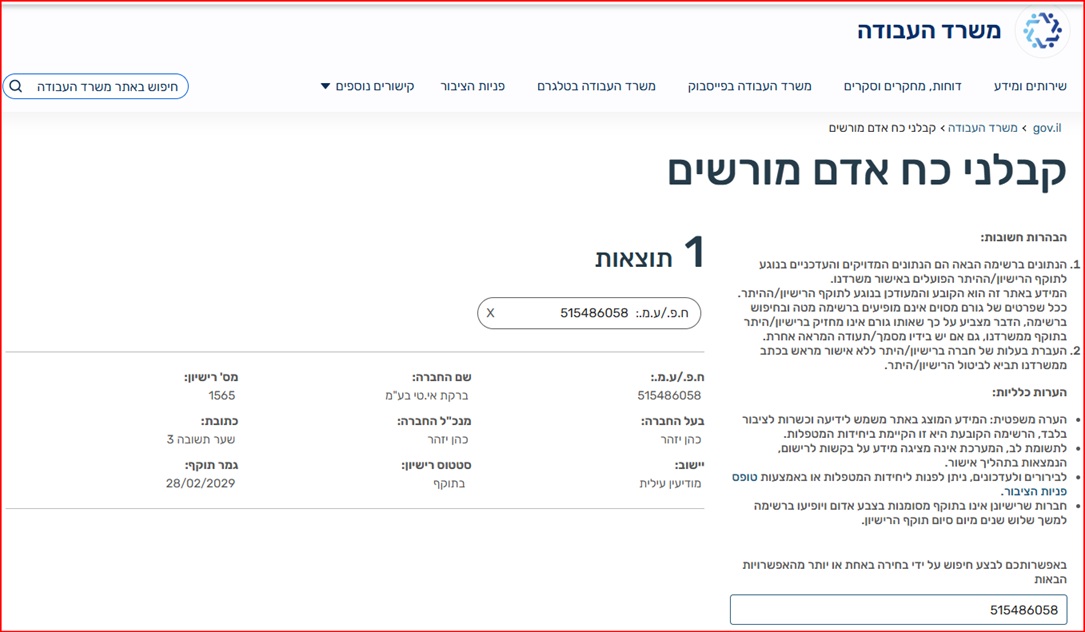
ח.פ 515486058 · רישיון קבלן כוח אדם 1565
משרד: שערי תשובה 31, מודיעין עילית · דואר: הר נבו 3, חשמונאים
טל' 08-976-1874 · פקס 08-917-1511 · neto@neto.work

פתיחה →

קביעת פגישת דמו

בחרו מועד נוח · נציג יחזור לאישור בטלפון/מייל

בחרו יום
בחרו שעה (11:30–15:30)
התקדמות במדריךGuide progress0%
מדריך מעסיקEmployer Guide

כך מזמינים עובד או פרילנסר ומעבירים לו תשלום דרך NETO

מדריך חזותי, שלב אחר שלב, החל מהרשמת המעסיק ועד שליחת ההזמנה, הפקת החשבונית והעברת השכר.

Invite a worker or freelancer and pay through NETO

A visual, step-by-step guide from employer registration through invitation, invoicing and salary transfer.

תקציר AI · המדריך בחצי דקה
  • מה עושים כאן: נרשמים כמעסיק במערכת NETO.LIVE, שולחים הזמנה לעובד או לפרילנסר · ו-NETO מטפלת בכל השאר: תלוש, מסים והעברת השכר.
  • שלושה מסלולים: עובד קבוע · עובד זמני · בקשת חשבונית מפרילנסר.
  • מה צריך להכין: פרטי העסק (שם, ח.פ/עוסק, כתובת) ופרטי העובד (שם, טלפון, דוא״ל).
  • כמה זמן לוקח: ההרשמה ושליחת ההזמנה הראשונה · כ-10 דקות.
  • בלי בירוקרטיה: לא צריך לפתוח חברה או תיק ניכויים · NETO פועלת ברישיון קבלן כוח־אדם 1565.
AI summary · the guide in 30 seconds
  • What you do here: register as an employer on NETO.LIVE and send an invitation to a worker or freelancer · NETO handles the rest: payslip, taxes and salary transfer.
  • Three tracks: permanent employee · temporary worker · freelancer invoice request.
  • What to prepare: business details (name, company/business number, address) and the worker's details (name, phone, email).
  • How long it takes: registration and the first invitation · about 10 minutes.
  • No bureaucracy: no company or withholding file needed · NETO operates under manpower licence 1565.

רוצים לראות את זה בווידאו? דקה וחצי וזה ברור

סרטון מוקריין בעברית שעובר על כל שלבי המדריך · מההרשמה ועד התשלום.

Prefer to watch it? A minute and a half and it's clear

A narrated English video walking through every step of this guide · from registration to payment.

1
שלב 1 מתוך 11

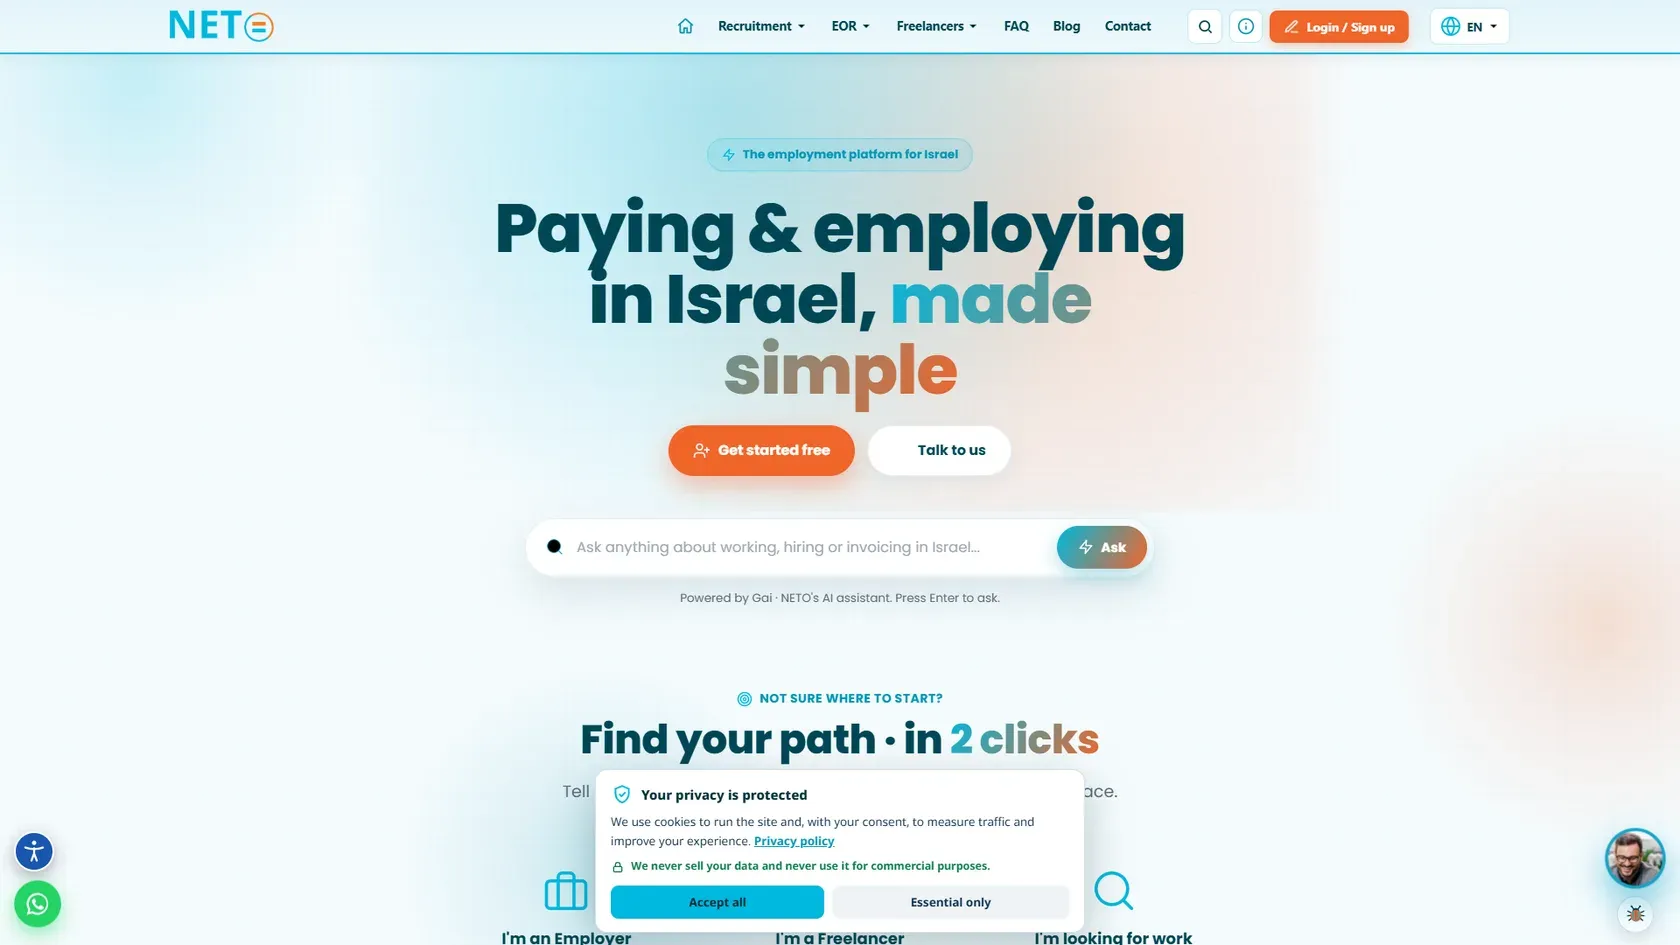
כניסה למערכת NETO

באתר NETO לוחצים על הכפתור הכתום „כניסה / הרשמה” בחלק העליון של המסך.

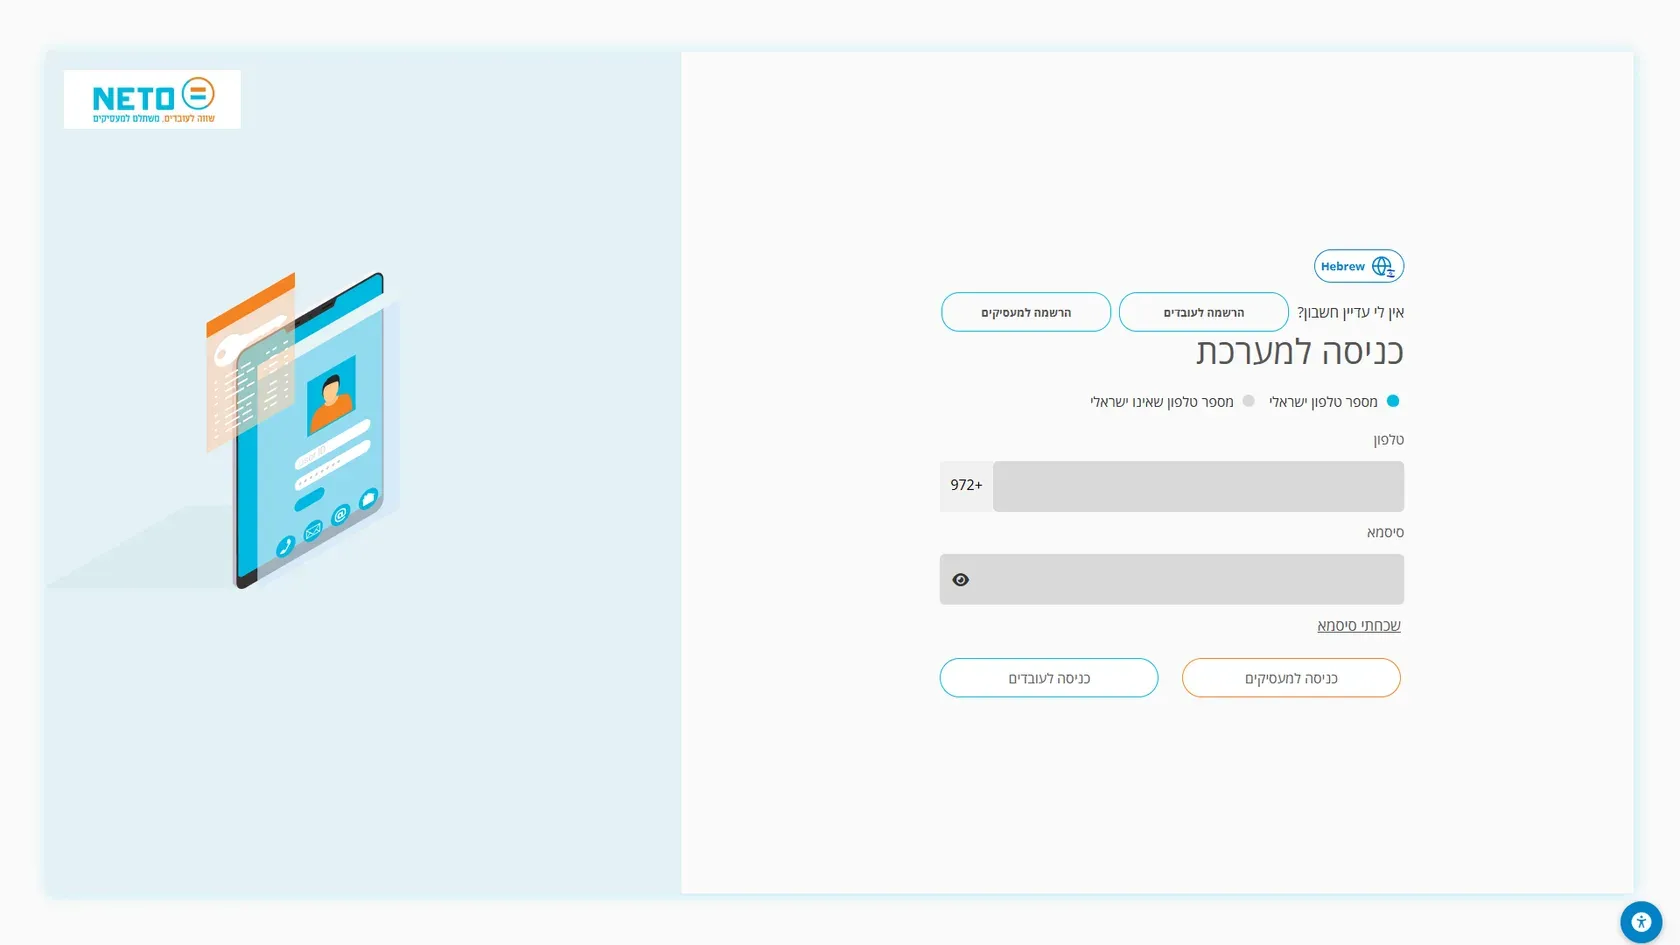
חשוב לדעת: מעסיק קיים יכול לבחור בכניסה לחשבון. מעסיק חדש ממשיך להרשמה.
Step 1 of 11

Enter the NETO system

On the NETO website, click the orange “Login / Sign up” button at the top of the screen.

Important: An existing employer can log in. A new employer should continue to registration.
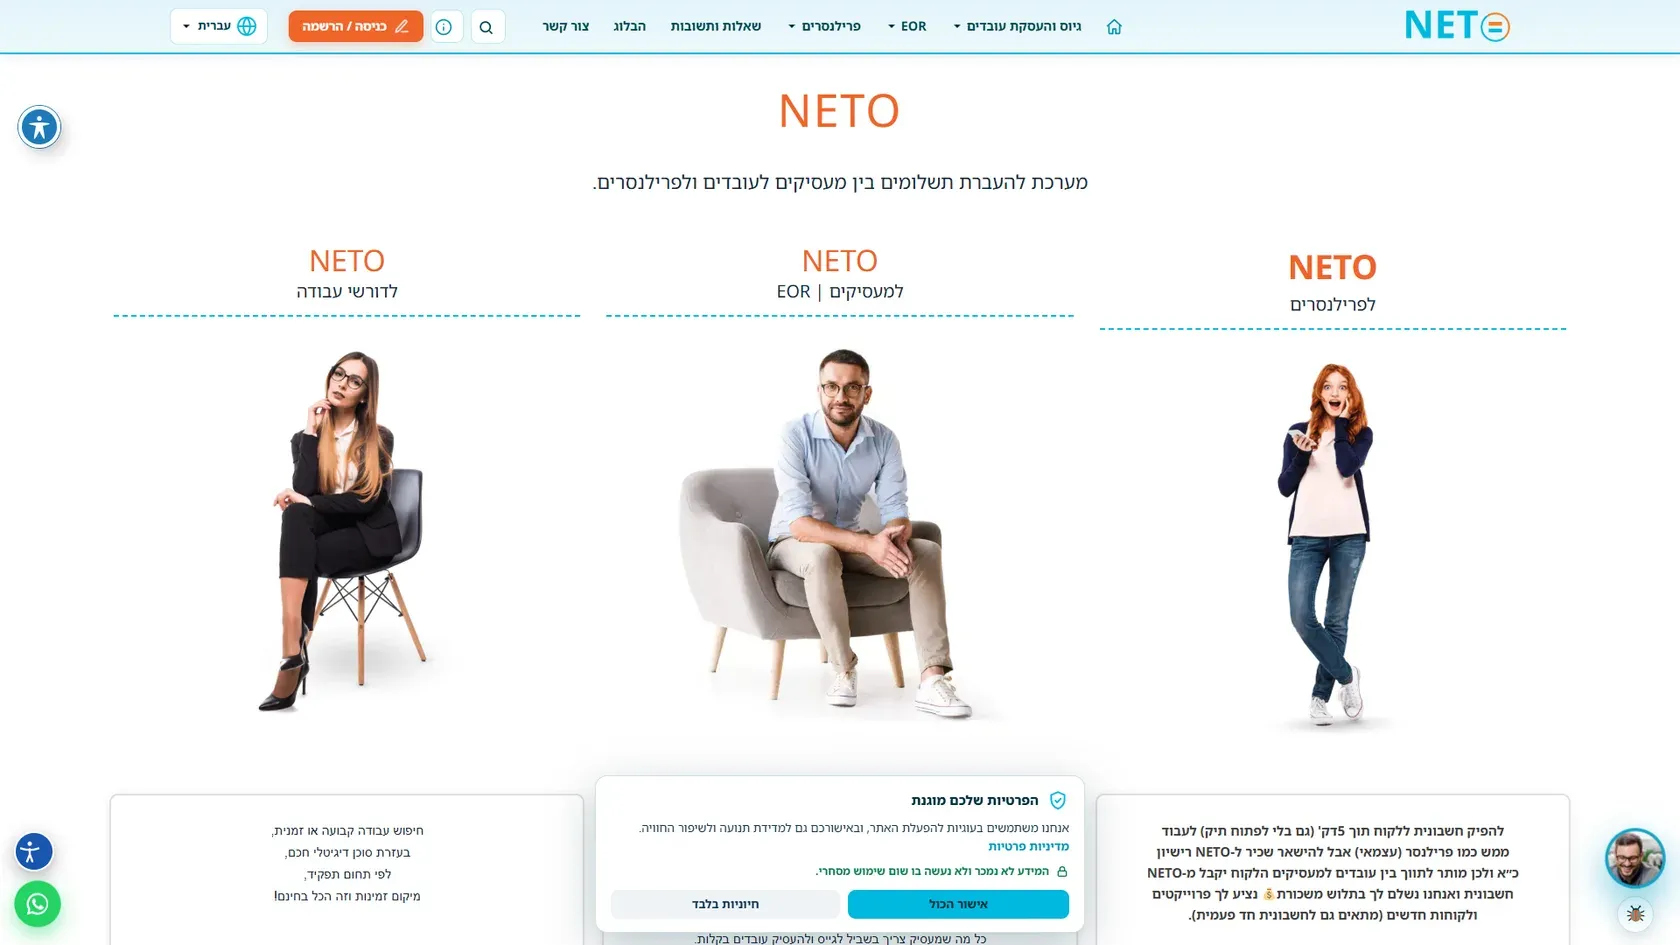
כניסה למערכת NETO Enter the NETO system
2
שלב 2 מתוך 11

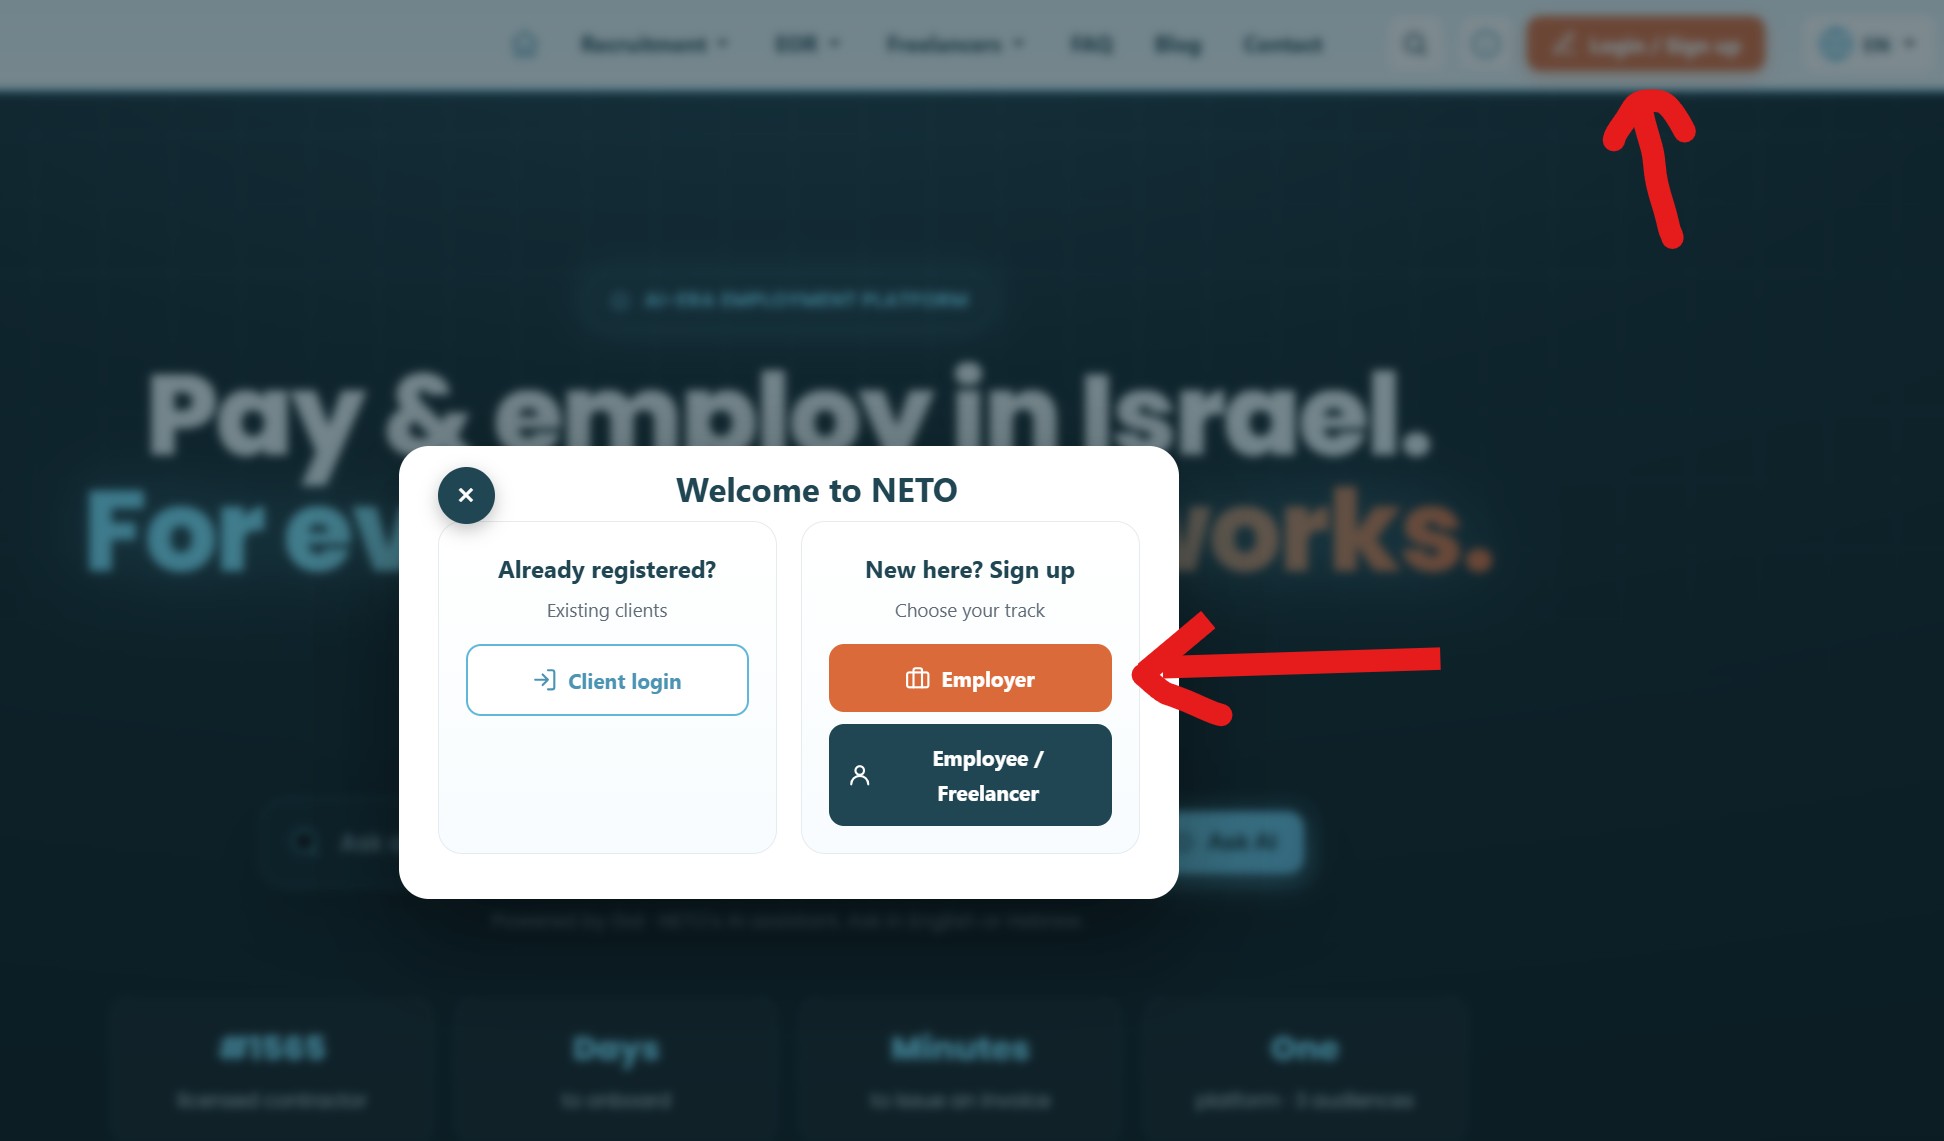
בחירת מסלול מעסיק

בחלון שנפתח בוחרים באפשרות Employer / מעסיק.

חשוב לדעת: המסלול Employee / Freelancer מיועד לעובד או לפרילנסר שנרשם בעצמו.
Step 2 of 11

Choose the employer track

In the window that opens, choose Employer.

Important: The Employee / Freelancer track is for a worker or freelancer registering independently.
בחירת מסלול מעסיק Choose the employer track
3
שלב 3 מתוך 11

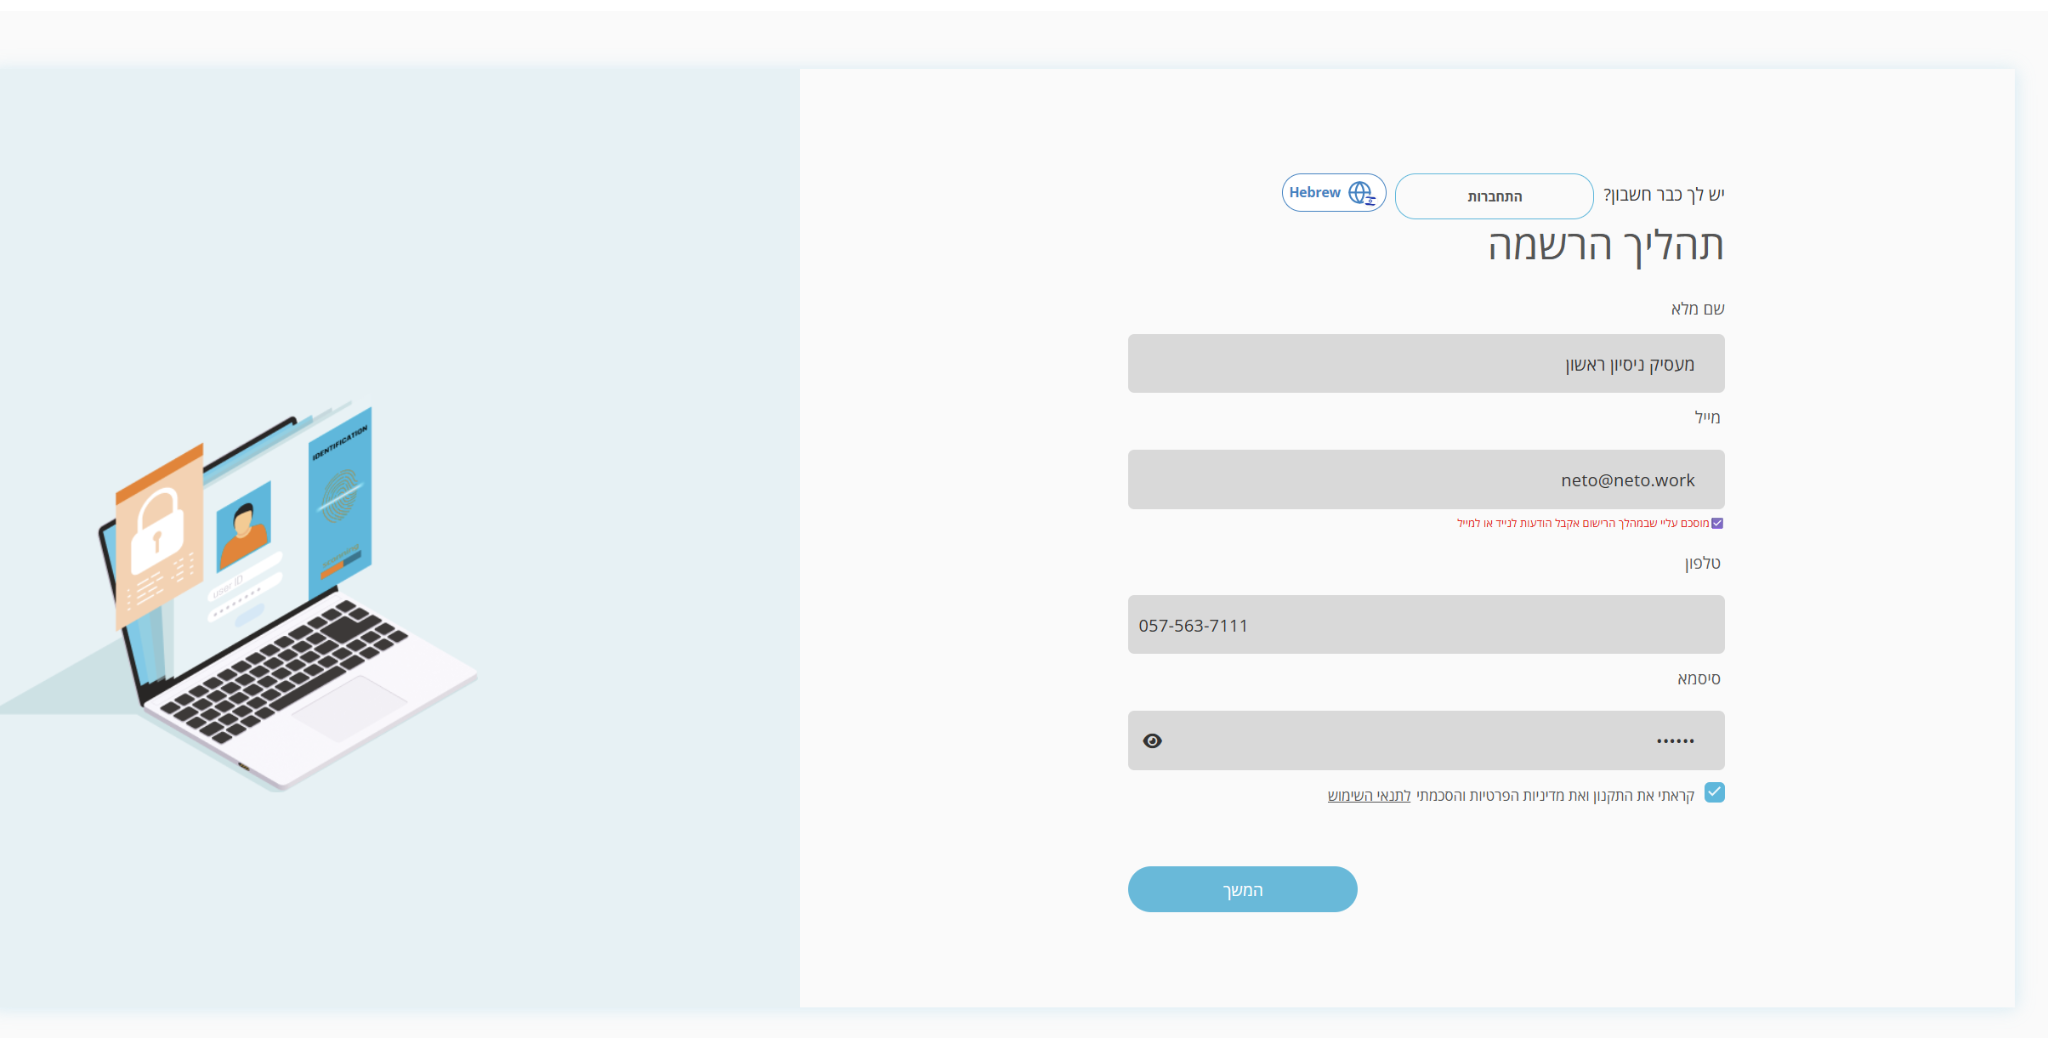
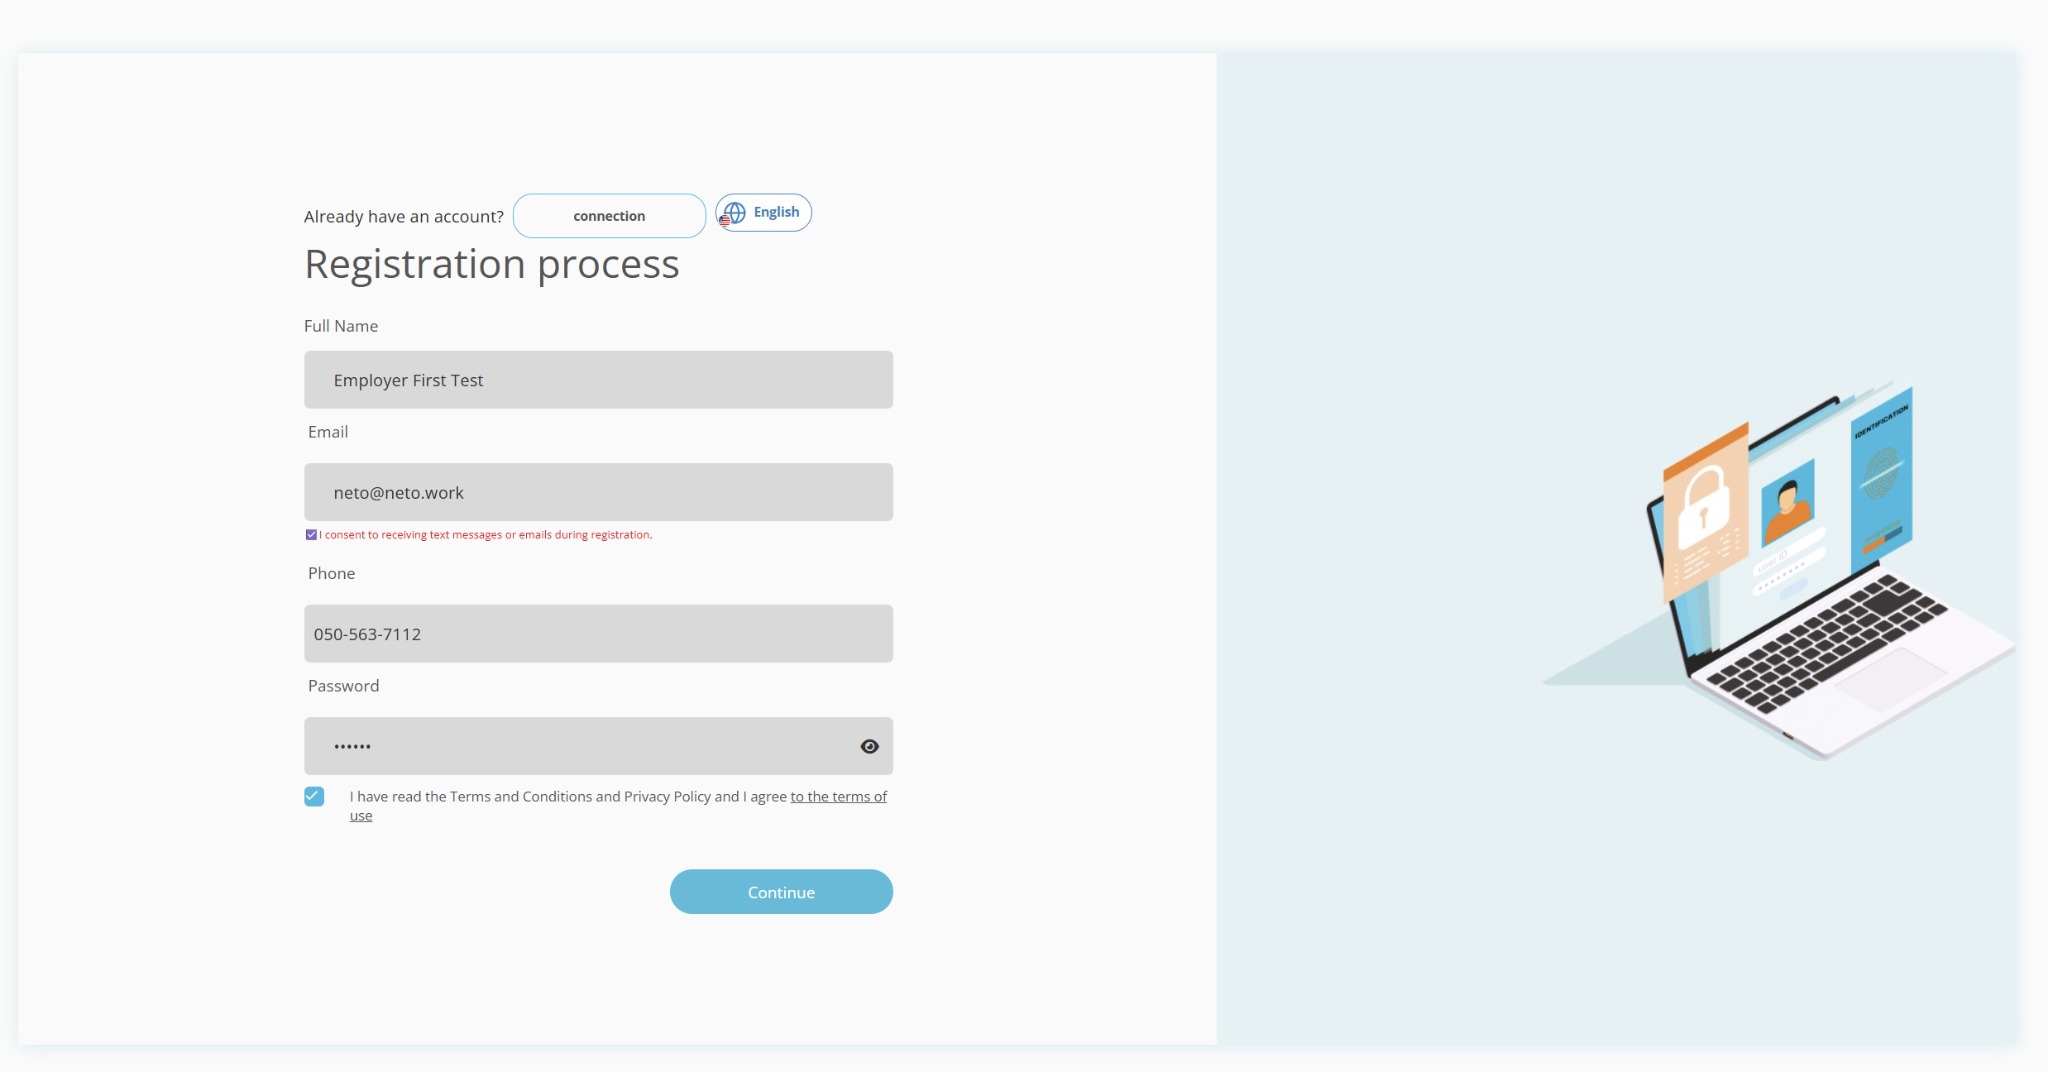
הרשמת המעסיק

ממלאים שם מלא, כתובת דוא״ל, מספר טלפון וסיסמה. מאשרים את תנאי השימוש ולוחצים „המשך”.

חשוב לדעת: יש להשתמש בכתובת דוא״ל ובמספר טלפון פעילים, משום שאליהם יישלח קוד האימות.
Step 3 of 11

Employer registration

Enter the full name, email, phone number and password. Accept the terms and click Continue.

Important: Use an active email address and phone number because the verification code will be sent to them.
הרשמת המעסיק Employer registration
4
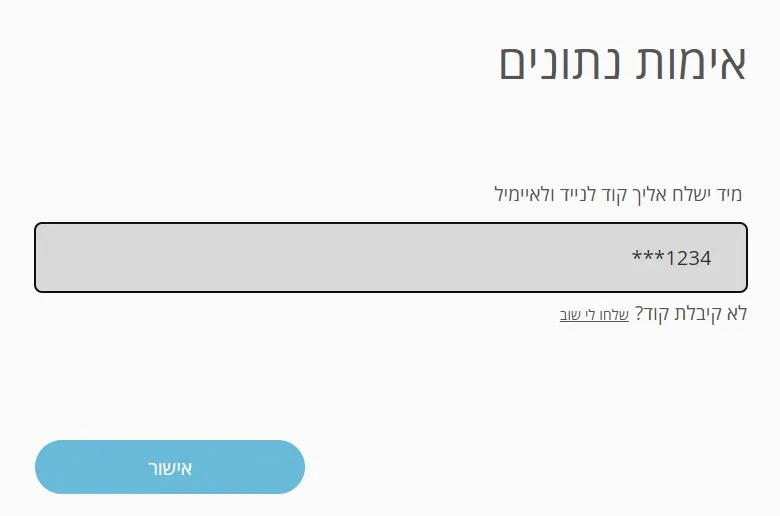
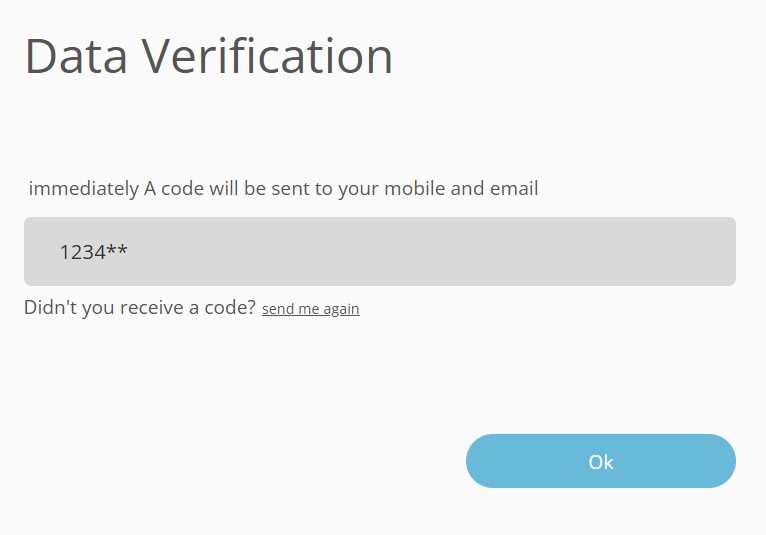
שלב 4 מתוך 11

אימות פרטי ההרשמה

המערכת שולחת קוד אימות לנייד ולדוא״ל. מזינים את הקוד ולוחצים OK.

חשוב לדעת: אם הקוד לא התקבל, לוחצים על „שלח שוב”.
Step 4 of 11

Verify the registration details

The system sends a verification code to the phone and email. Enter the code and click OK.

Important: If the code was not received, click “Send again”.
אימות פרטי ההרשמה Verify the registration details
5
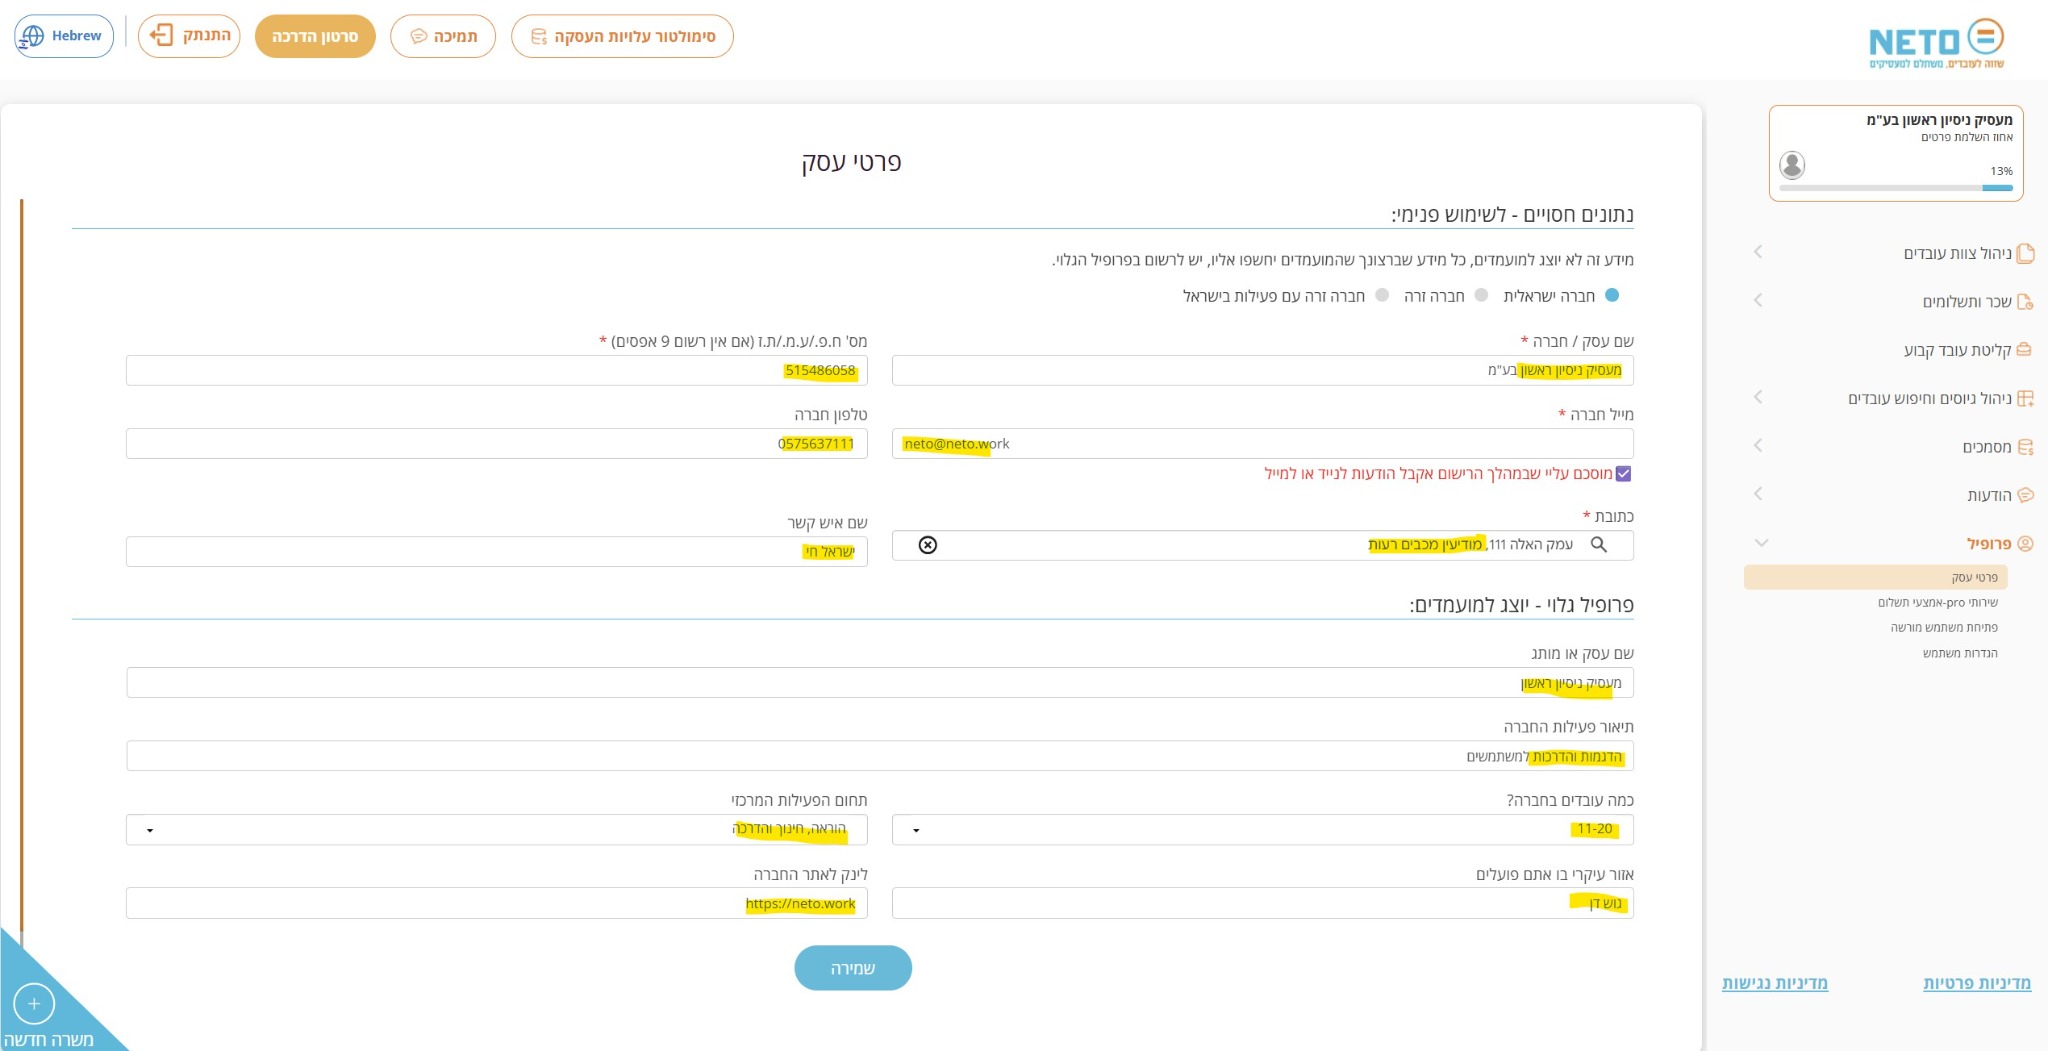
שלב 5 מתוך 11

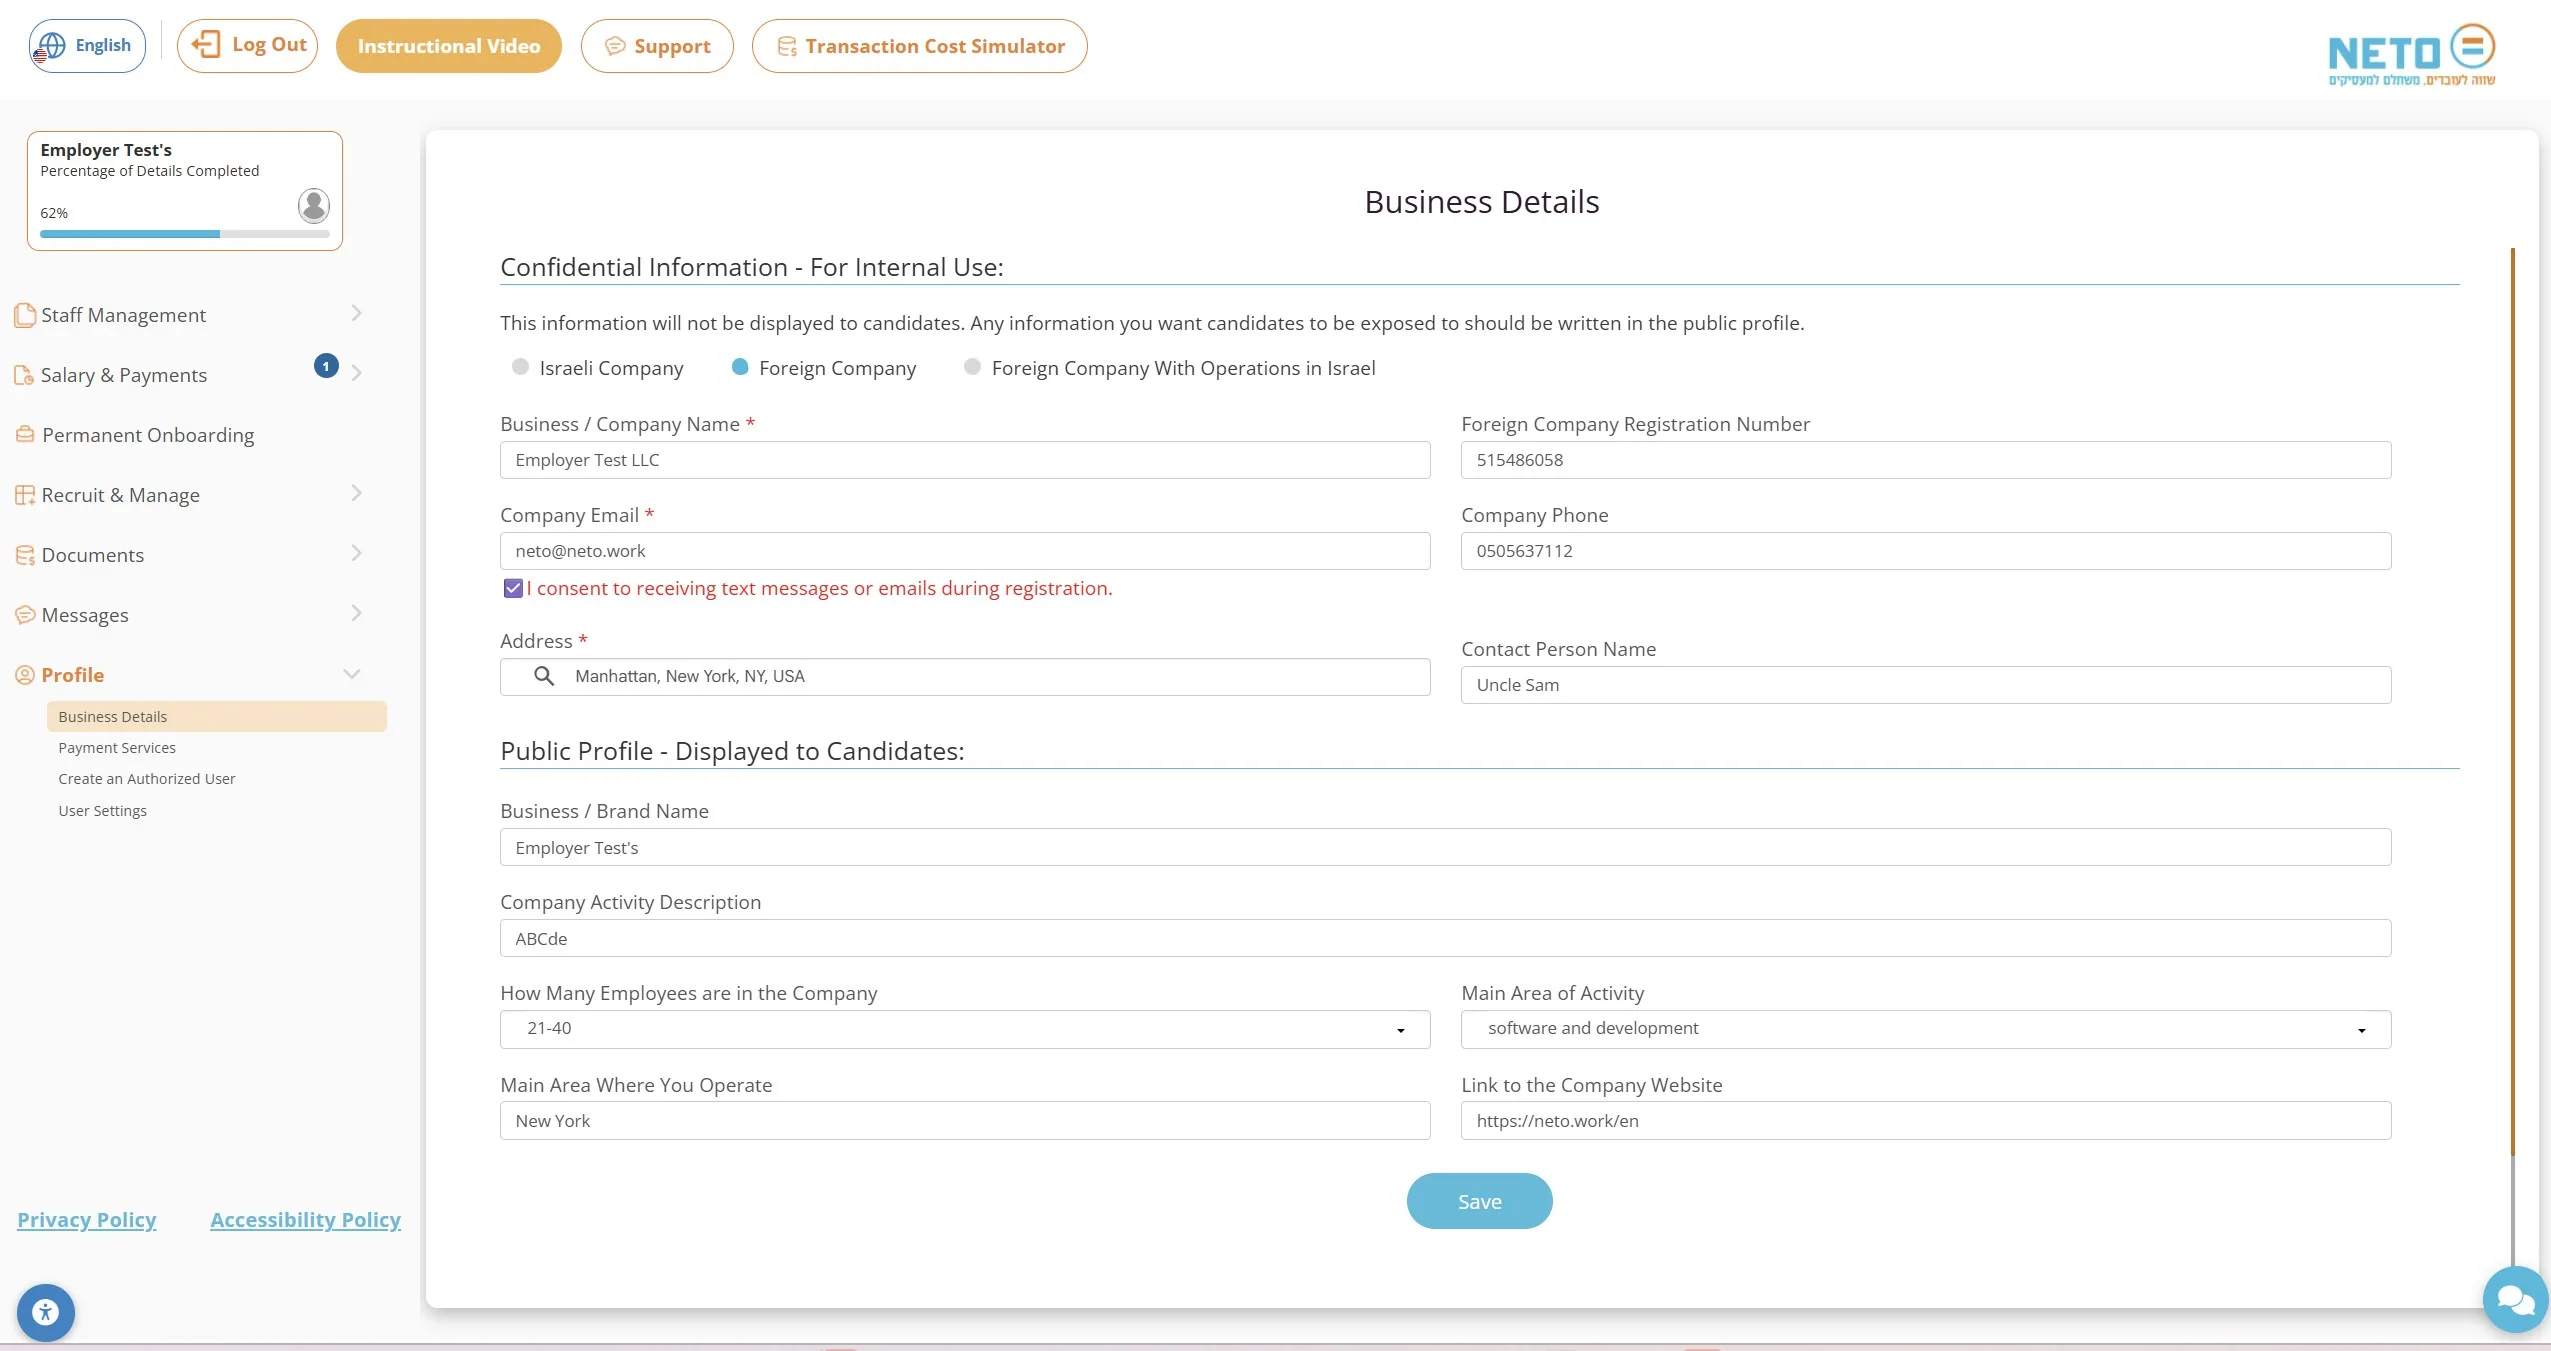
מילוי פרטי העסק

ממלאים את שם העסק, מספר החברה או העוסק, דוא״ל, טלפון, כתובת ואיש קשר. לאחר מכן מוסיפים את פרטי הפרופיל שיוצגו לעובדים.

חשוב לדעת: בסיום לוחצים „שמירה”. הפרטים ניתנים לעדכון גם בהמשך דרך אזור הפרופיל.
Step 5 of 11

Complete the business details

Enter the business name, company or business number, email, phone, address and contact person. Then add the profile details that will be shown to workers.

Important: Click Save when finished. The details can later be updated from the Profile area.
מילוי פרטי העסק Complete the business details
6
שלב 6 מתוך 11

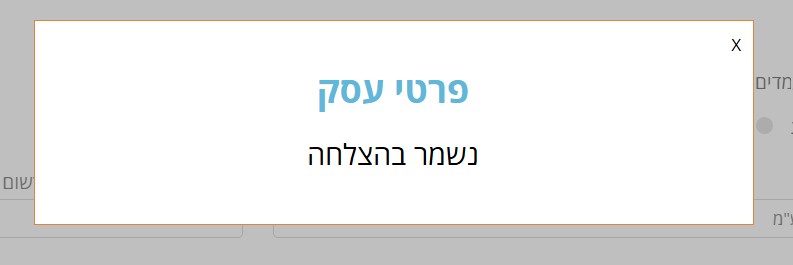
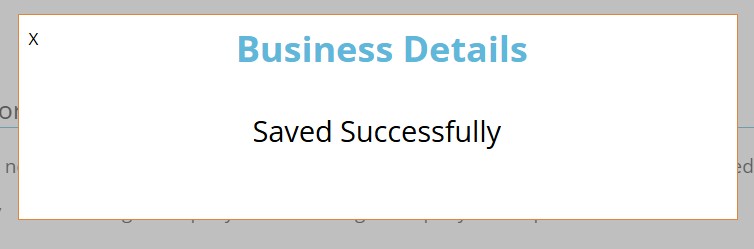
אישור שמירת פרטי העסק

לאחר השמירה מופיעה הודעת הצלחה. סוגרים את ההודעה וממשיכים למסך הראשי.

חשוב לדעת: אם ההודעה אינה מופיעה, יש לבדוק אם חסר שדה חובה.
Step 6 of 11

Business details saved

After saving, a success message appears. Close it and continue to the main screen.

Important: If the message does not appear, check whether a required field is missing.
אישור שמירת פרטי העסק Business details saved
7
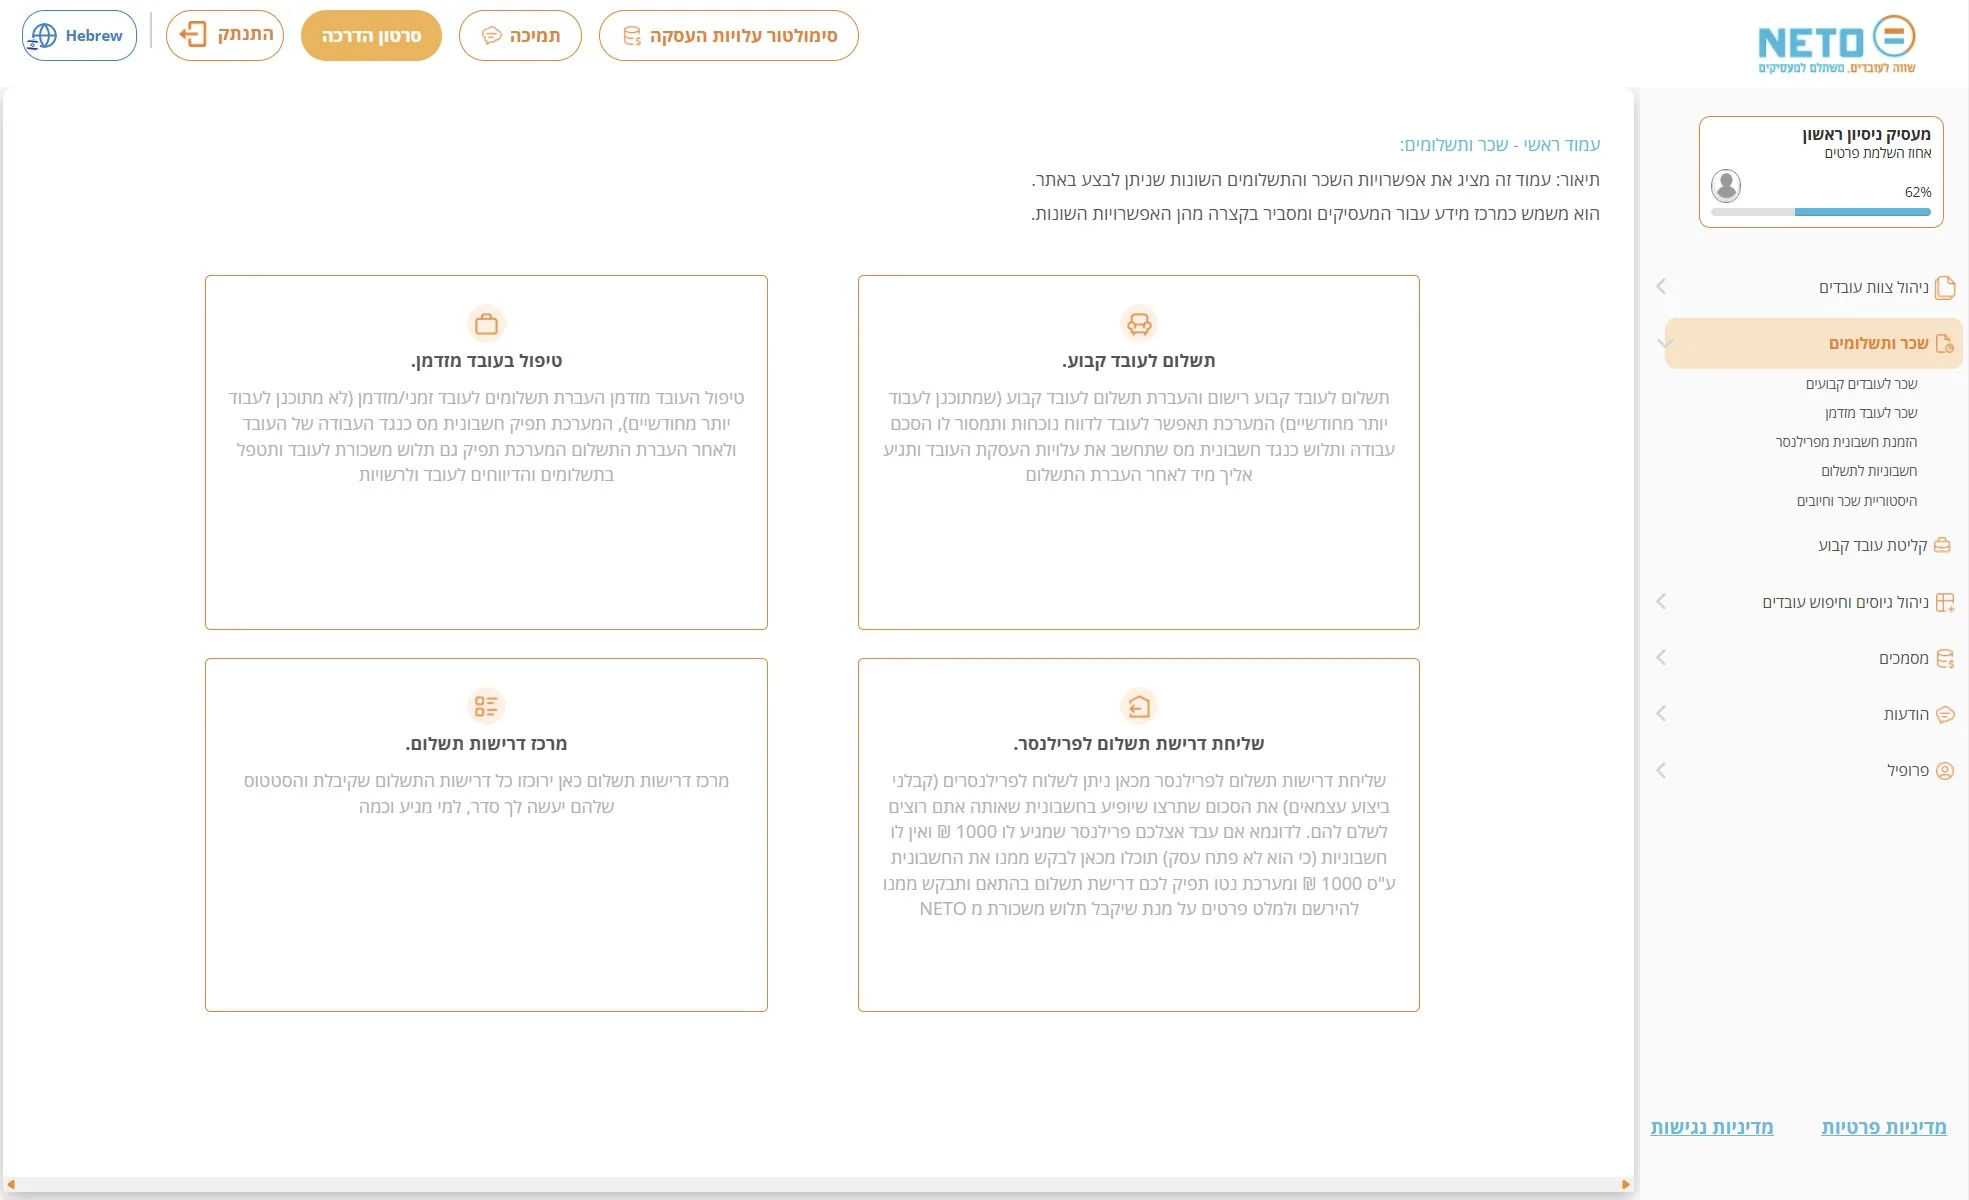
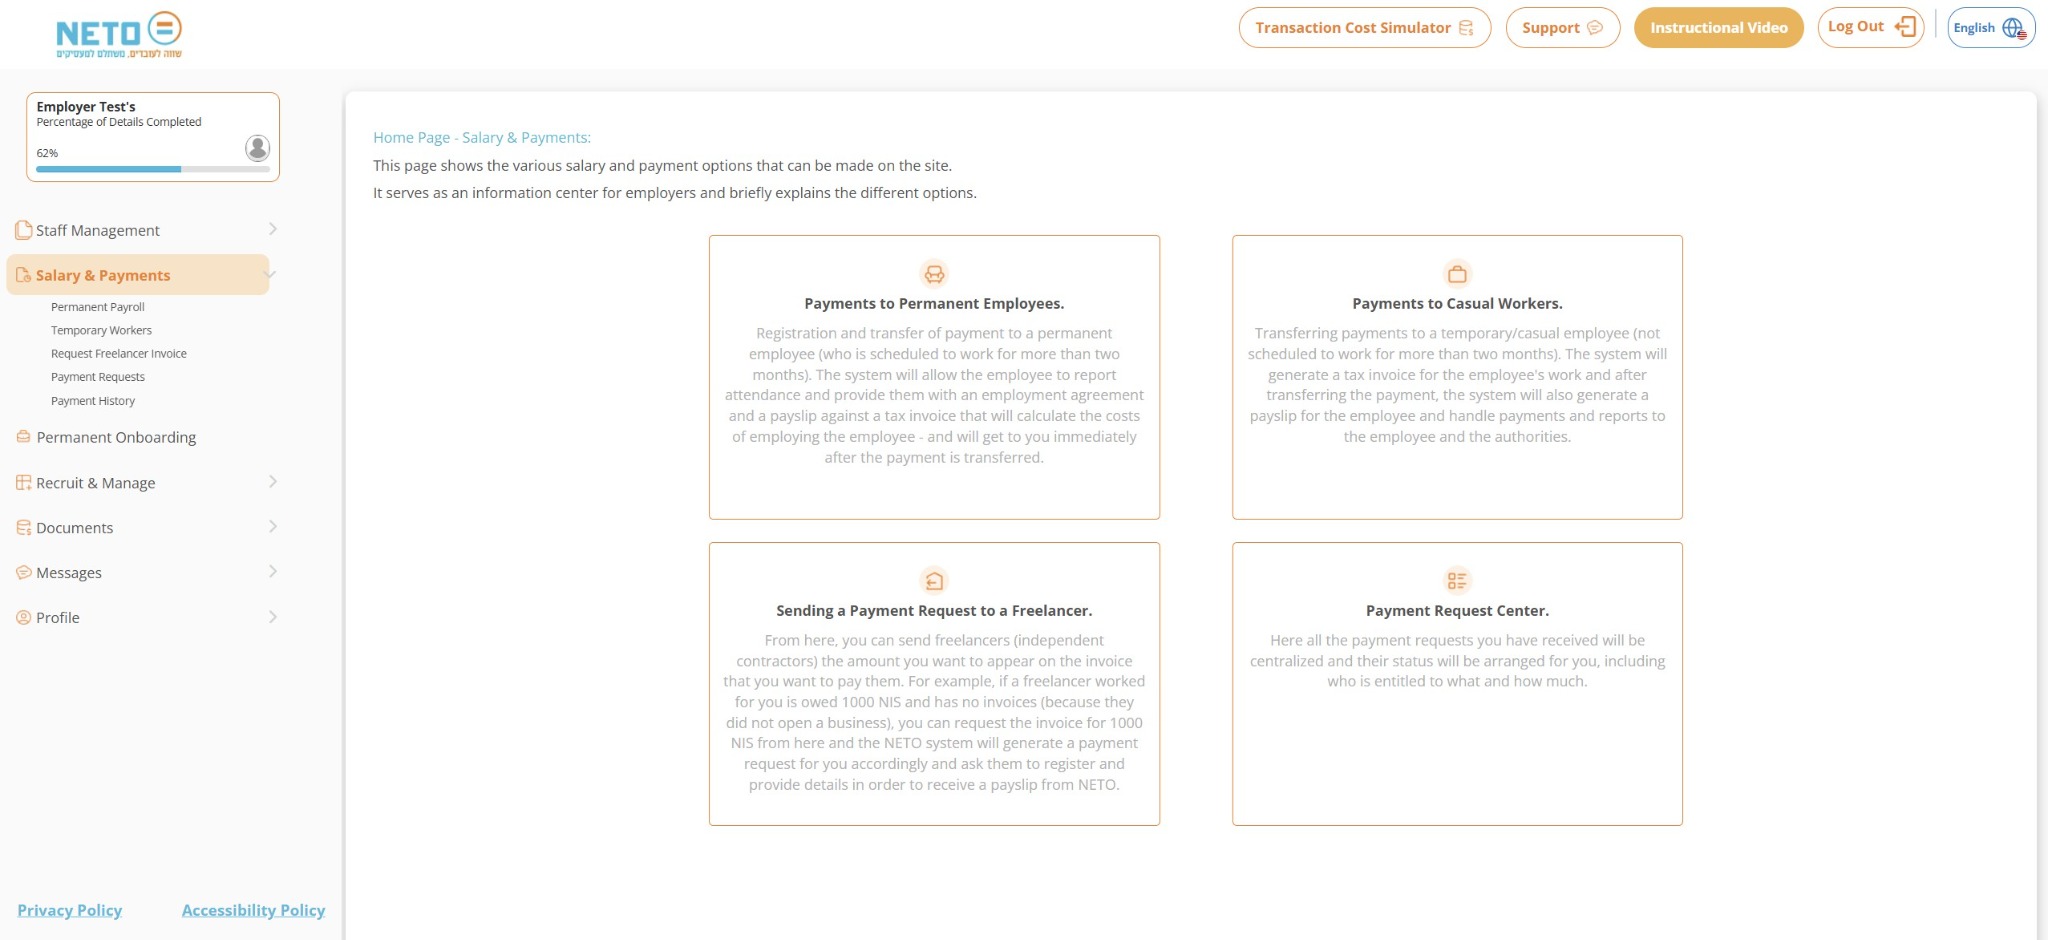
שלב 7 מתוך 11

בחירת סוג ההעסקה או התשלום

נכנסים ל„שכר ותשלומים”. כאן בוחרים את המסלול המתאים: עובד קבוע, עובד זמני או בקשת חשבונית מפרילנסר.

חשוב לדעת: לבקשת תשלום מפרילנסר שאין לו עסק, בוחרים „בקשת חשבונית מפרילנסר”.
Step 7 of 11

Choose the employment or payment type

Open Salary & Payments. Choose the relevant track: permanent employee, temporary worker or request a freelancer invoice.

Important: To request payment from a freelancer without a registered business, choose “Request Freelancer Invoice”.
בחירת סוג ההעסקה או התשלום Choose the employment or payment type
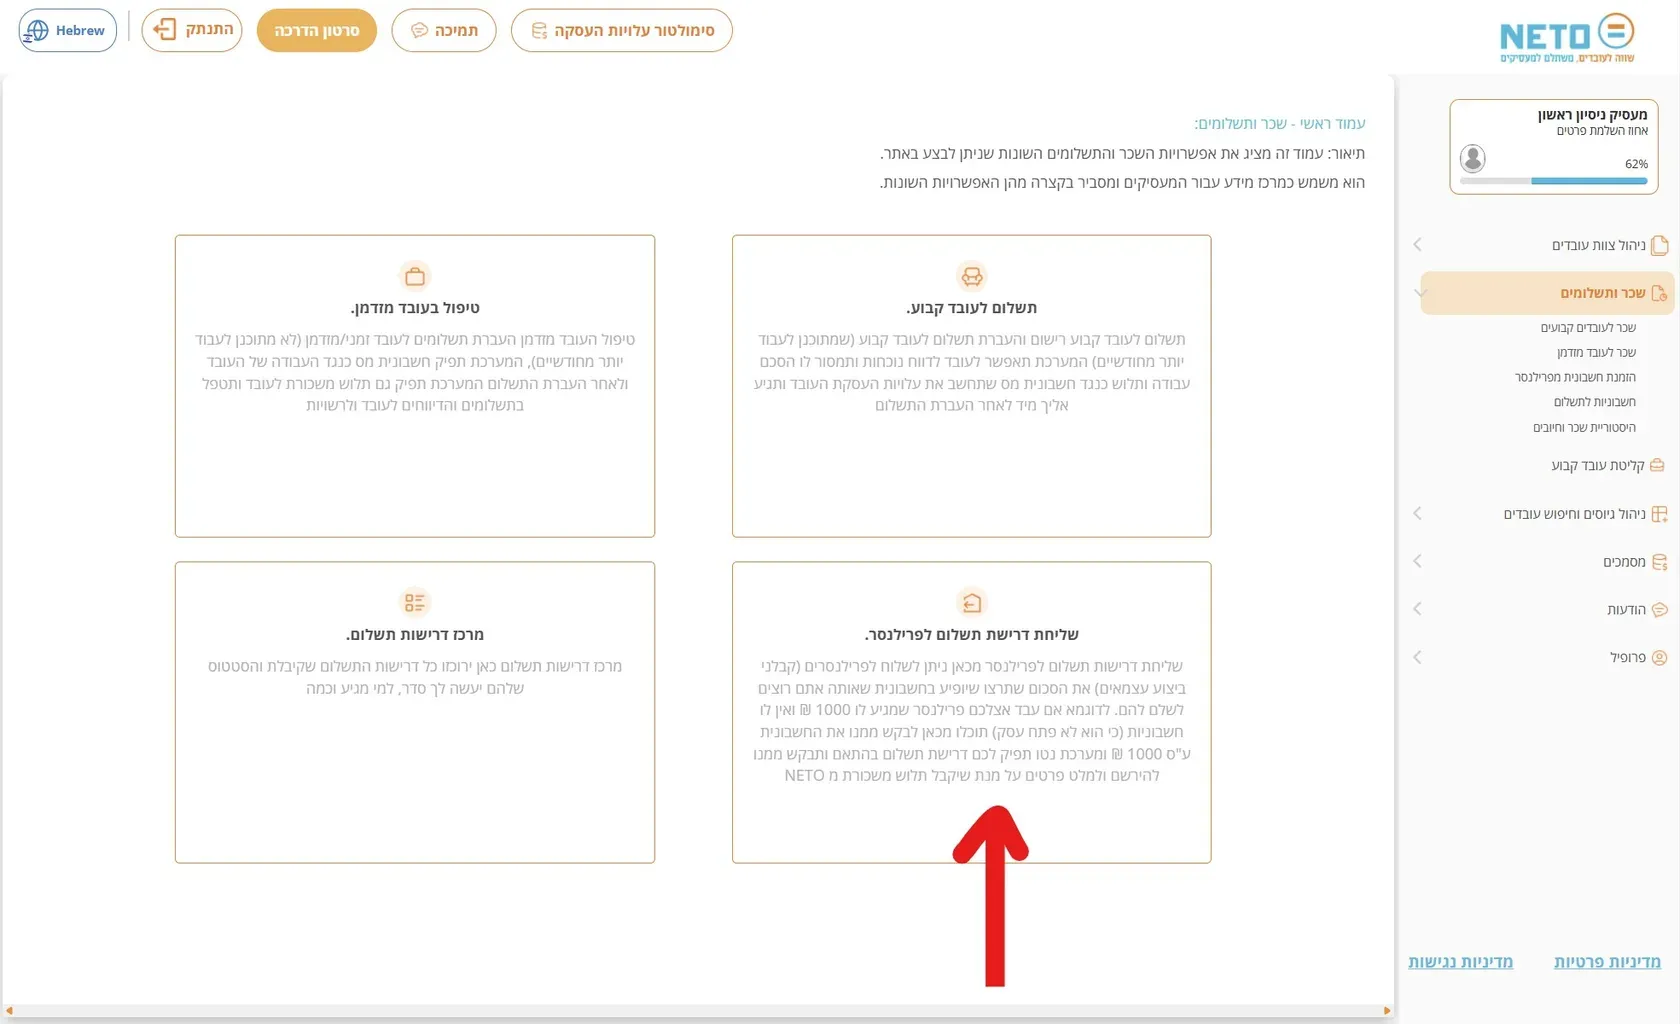
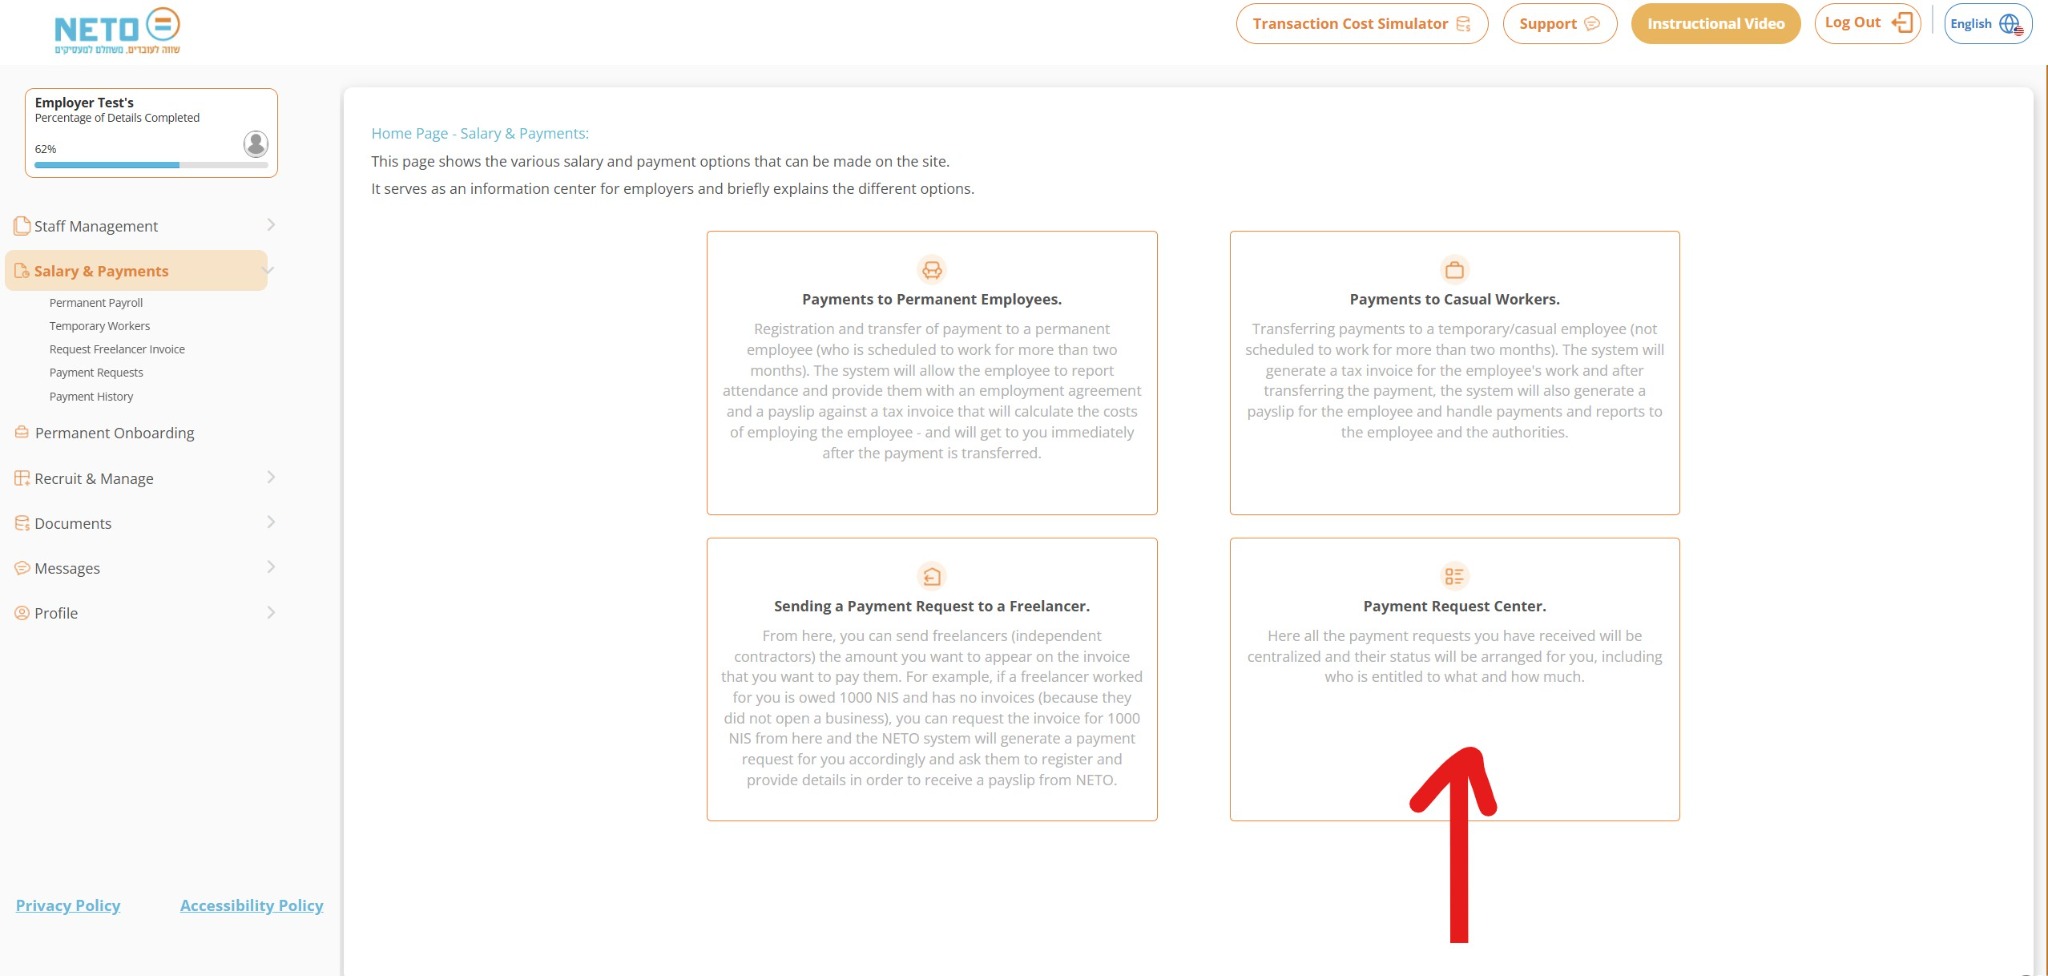
8
שלב 8 מתוך 11

פתיחת בקשת תשלום לפרילנסר

לוחצים על „בקשת חשבונית מפרילנסר” או על מרכז בקשות התשלום, בהתאם לפעולה שרוצים לבצע.

חשוב לדעת: בקשה חדשה מיועדת לשליחת הזמנה. מרכז הבקשות מיועד למעקב, אישור וניהול בקשות קיימות.
Step 8 of 11

Create a freelancer payment request

Click “Request Freelancer Invoice” or open the Payment Request Center, depending on the required action.

Important: A new request sends an invitation. The Payment Request Center is used to monitor and manage existing requests.
פתיחת בקשת תשלום לפרילנסר Create a freelancer payment request
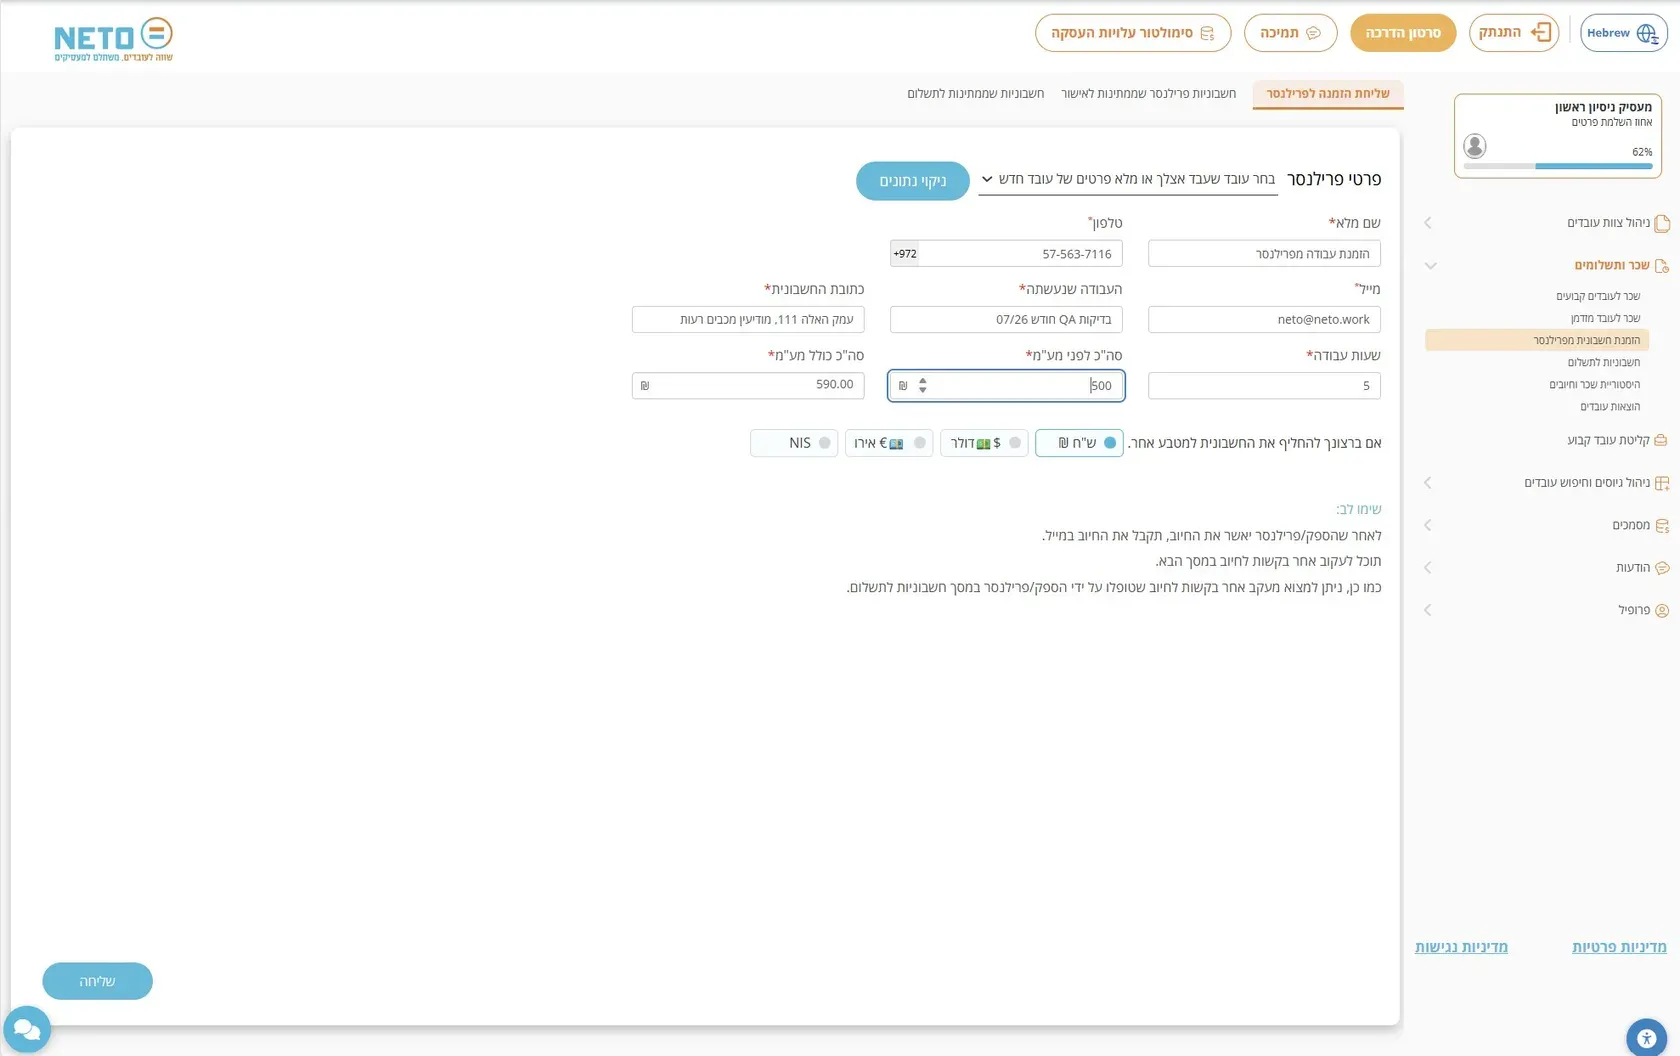
9
שלב 9 מתוך 11

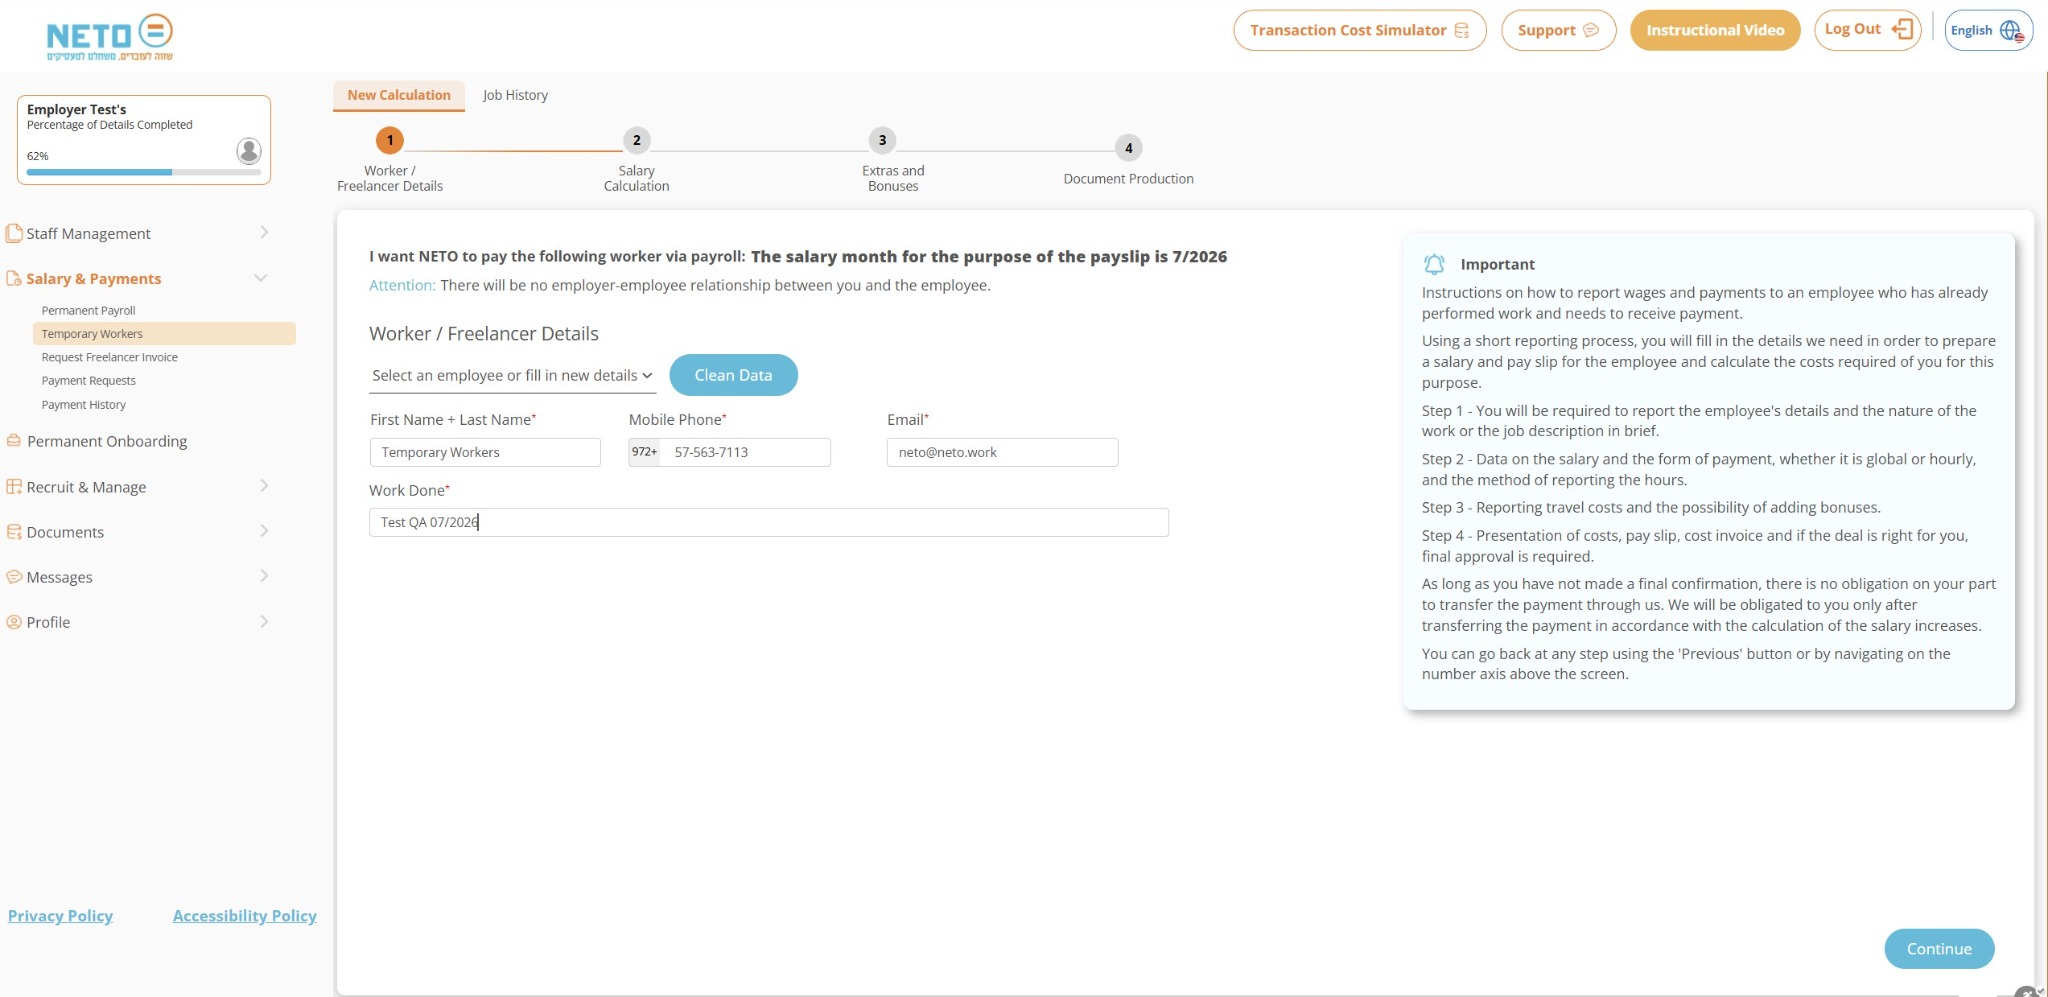
הזנת פרטי העובד או הפרילנסר

מזינים שם, טלפון, דוא״ל ותיאור קצר של העבודה. אם העובד כבר קיים במערכת, אפשר לבחור אותו מהרשימה.

חשוב לדעת: הפרטים משמשים לשליחת ההזמנה ולהמשך תהליך הרישום של העובד.
Step 9 of 11

Enter the worker or freelancer details

Enter the name, phone number, email and a short work description. If the worker already exists in the system, select them from the list.

Important: These details are used to send the invitation and continue the worker’s registration process.
הזנת פרטי העובד או הפרילנסר Enter the worker or freelancer details
10
שלב 10 מתוך 11

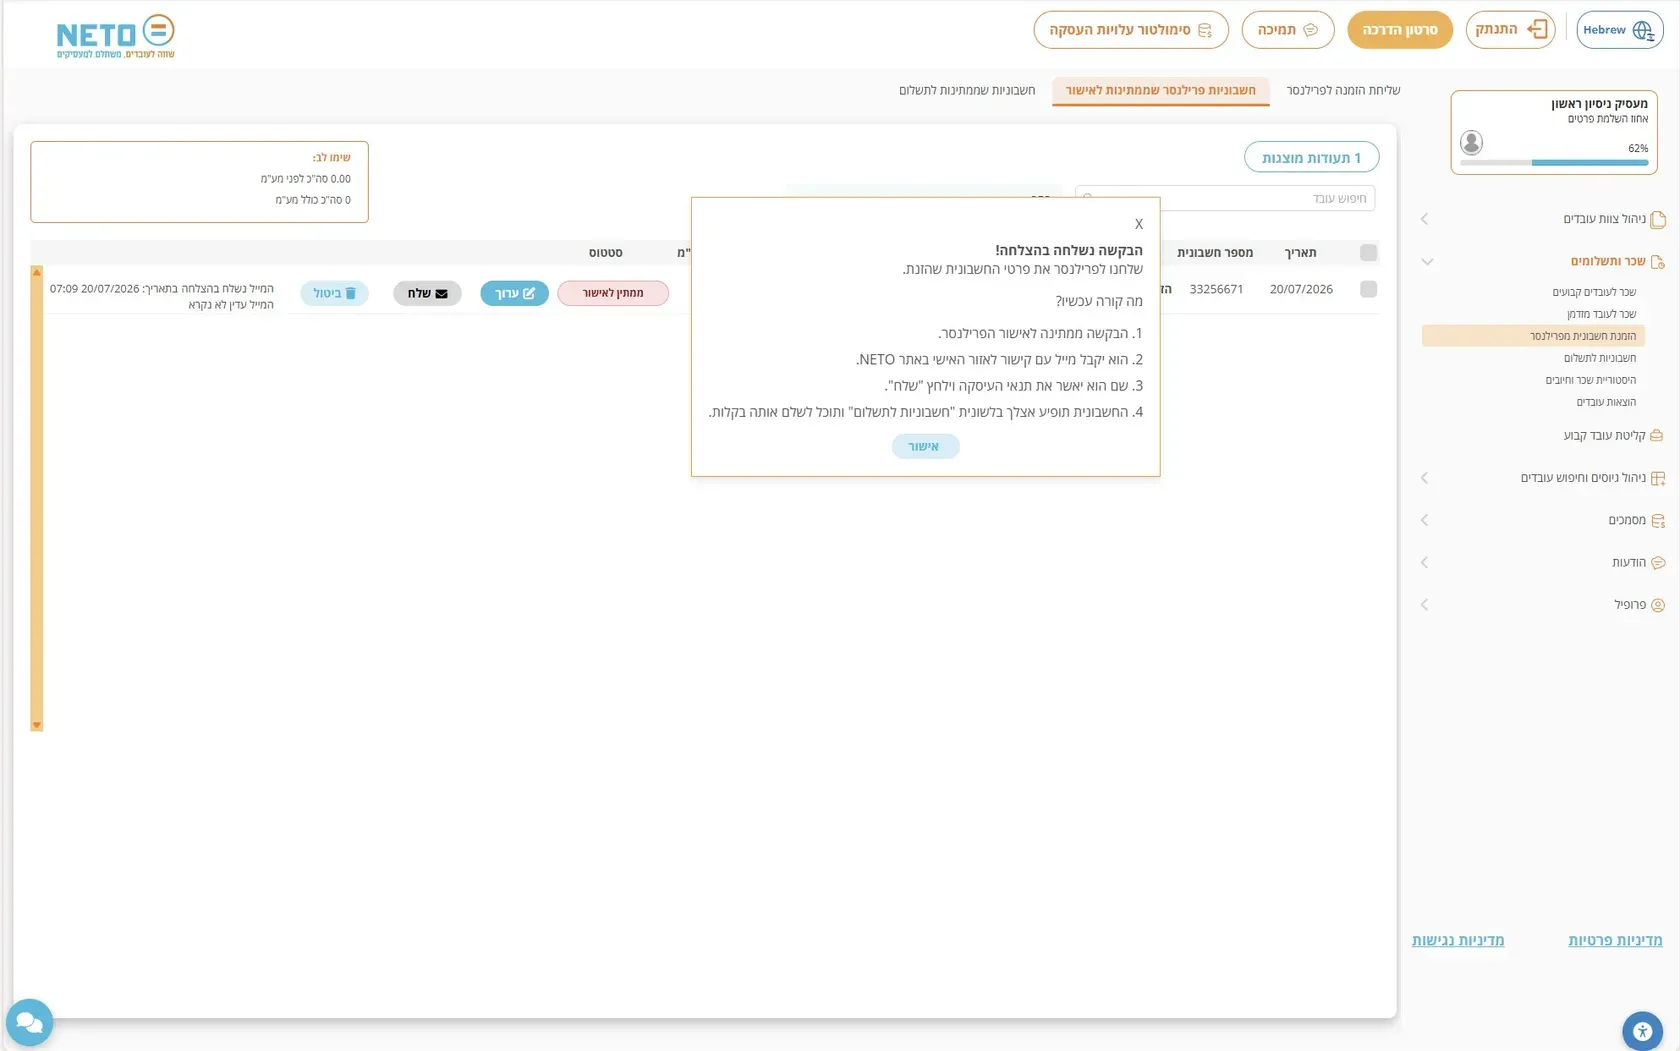
שליחת ההזמנה לעובד

לאחר השלמת פרטי העבודה והסכום, המערכת שולחת לעובד הודעה עם קישור אישי להמשך התהליך.

חשוב לדעת: מהשלב הזה העובד משלים את הרישום, טופס 101, פרטי הבנק והאישורים הנדרשים.
Step 10 of 11

Send the invitation to the worker

After completing the work details and amount, the system sends the worker a message with a personal link.

Important: From this point, the worker completes registration, Form 101, bank details and the required approvals.
שליחת ההזמנה לעובד Send the invitation to the worker
11
שלב 11 מתוך 11

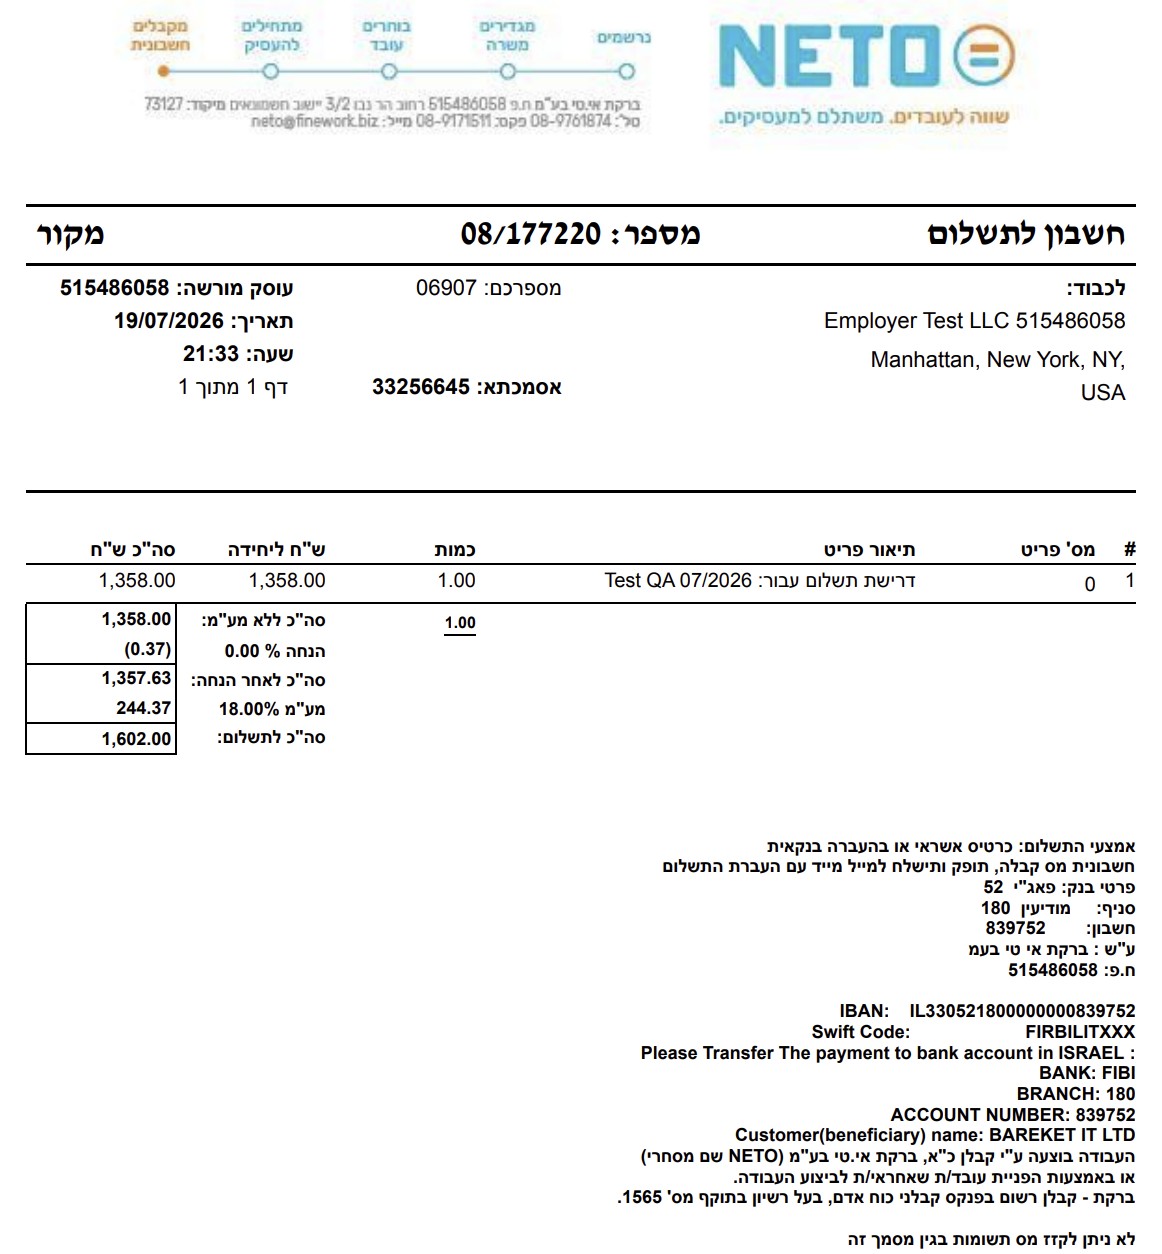
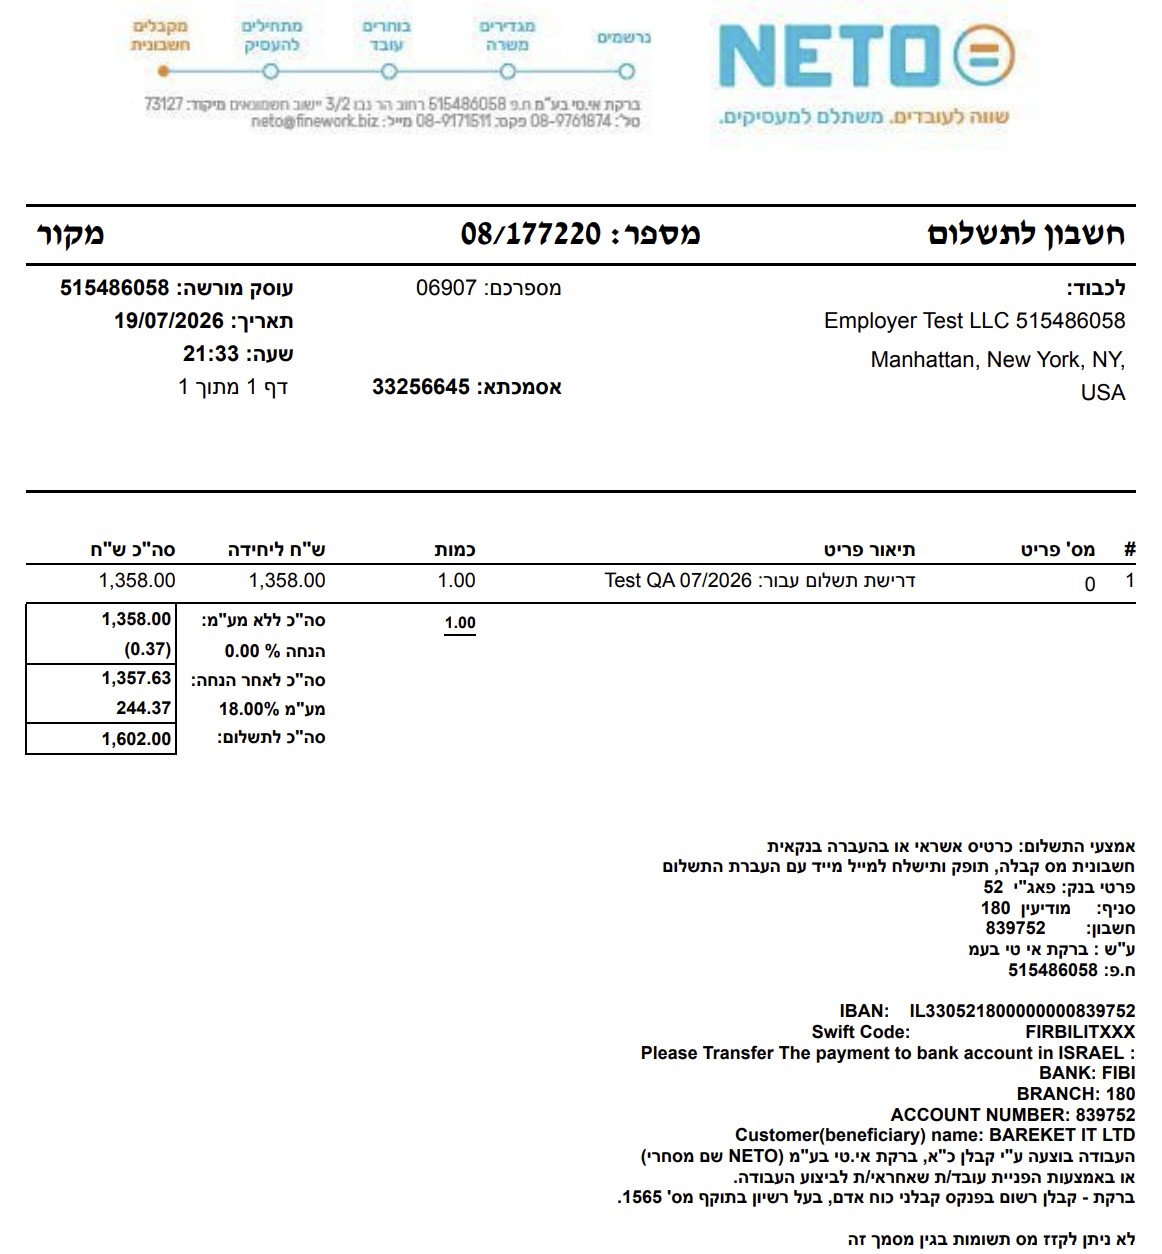
חשבונית לתשלום ומעקב

לאחר אישור התהליך מופקת חשבונית לתשלום עם פרטי ההעברה. ניתן לעקוב במערכת אחר סטטוס הבקשה והתשלום.

חשוב לדעת: לאחר קליטת התשלום והשלמת מסמכי העובד, NETO מפיקה תלוש ומעבירה את השכר לעובד.
Step 11 of 11

Payment invoice and tracking

After approval, a payment invoice is issued with transfer details. The request and payment status can be tracked in the system.

Important: After the payment is received and the worker’s documents are complete, NETO issues a payslip and transfers the salary.
חשבונית לתשלום ומעקב Payment invoice and tracking

שאלות ותשובות למעסיק

Employer FAQ

כמה עולה השירות למעסיק?How much does the service cost an employer?
עמלת NETO היא 5% מסכום החשבונית לפני מע״מ. אין דמי הקמה ואין התחייבות · משלמים רק כשיש תשלום בפועל.NETO's fee is 5% of the invoice amount before VAT. No setup fees and no commitment · you pay only when there is an actual payment.
האם אני צריך לפתוח חברה או תיק ניכויים כדי להעסיק דרך NETO?Do I need to open a company or a tax-withholding file to hire through NETO?
לא. NETO פועלת ברישיון קבלן כוח־אדם מס' 1565 מטעם משרד העבודה ומשמשת המעסיקה הרשמית של העובד: היא מפיקה תלוש, מנכה מס ומפרישה ביטוח לאומי ופנסיה · בלי שתצטרכו לפתוח חברה או תיק ניכויים.No. NETO operates under manpower licence No. 1565 from the Ministry of Labor and acts as the worker's formal employer: it issues the payslip, withholds tax and handles social security and pension · without you opening a company or a withholding file.
מה העובד או הפרילנסר צריך לעשות אחרי שקיבל את ההזמנה?What does the worker or freelancer do after receiving the invitation?
העובד מקבל הודעה עם קישור אישי, ודרכו משלים את הרישום: פרטים אישיים, טופס 101 ופרטי חשבון הבנק. מרגע שהשלים · התהליך ממשיך אוטומטית.The worker receives a message with a personal link and completes registration through it: personal details, Form 101 and bank account details. Once done, the process continues automatically.
מתי העובד מקבל את הכסף?When does the worker get paid?
לאחר שהתשלום שלכם נקלט והעובד השלים את המסמכים הנדרשים, NETO מפיקה תלוש שכר ומעבירה את השכר ישירות לחשבון הבנק של העובד.After your payment is received and the worker has completed the required documents, NETO issues a payslip and transfers the salary directly to the worker's bank account.
נתקעתי באחד השלבים · למי פונים?I'm stuck on one of the steps · who do I contact?
צוות התמיכה זמין בטלפון 08-9761874, בוואטסאפ 08-6228945 או דרך טופס יצירת הקשר באתר. אפשר גם לשאול את העוזר החכם בפינת המסך.Support is available by phone at +972-8-9761874, on WhatsApp at +972-8-6228945, or through the contact form. You can also ask the on-site assistant.

סיכום · כל התהליך בחמש שורות

  1. נרשמים כמעסיק ב-NETO.LIVE ומאמתים את הפרטים.
  2. ממלאים את פרטי העסק פעם אחת בלבד.
  3. בוחרים מסלול: עובד קבוע, עובד זמני או חשבונית מפרילנסר.
  4. מזינים את פרטי העובד ושולחים לו הזמנה · הוא משלים את הרישום בקישור אישי.
  5. משלמים לפי החשבונית · NETO מפיקה תלוש ומעבירה את השכר לעובד.

Summary · the whole process in five lines

  1. Register as an employer on NETO.LIVE and verify your details.
  2. Fill in your business details · once.
  3. Choose a track: permanent employee, temporary worker or freelancer invoice.
  4. Enter the worker's details and send the invitation · they complete registration via a personal link.
  5. Pay the invoice · NETO issues the payslip and transfers the salary.

נשארה שאלה? אנחנו כאן

צוות NETO עונה מהר · בוואטסאפ, בטלפון או בטופס יצירת קשר.

Still have a question? We're here

The NETO team answers fast · on WhatsApp, by phone or through the contact form.

אודות הכותב
יזהר כהןיכ
יזהר כהןיזם · מנכ״ל ושותף מייסד ב-NETO

יזהר כהן הוא מנכ״ל בעל ניסיון עסקי, יזמי וניהולי עשיר · תואר ראשון במנהל עסקים ותואר שני בלוגיסטיקה, המשלב ידע אקדמי עם ניסיון מעשי בניהול אלפי עובדים ותהליכי שכר והעסקה בישראל.

התחברו בלינקדאין
יש שאלה? בואו נדבר.
תגיות