Welcome to NETO

Log in to your account, or sign up in a minute.

Already registered?Existing clients
New here? Sign upChoose your track Employer Employee / Freelancer

Get in touch

Pick whatever works for you · we're here.

Info & policies

Everything about NETO · transparent and available

NETO · Bareket I.T. Ltd.
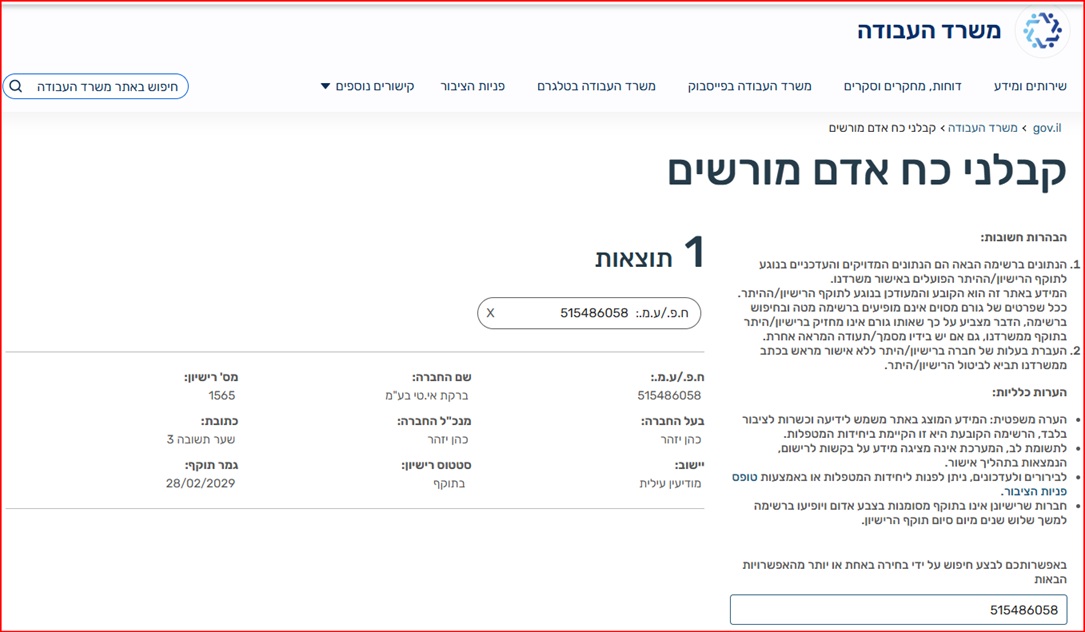
Reg. 515486058 · Licensed manpower contractor #1565
Office: Sha'arei Teshuva 31, Modi'in Illit
Tel +972-8-976-1874 · neto@neto.work

Open →

Book a demo

Pick a convenient time · we'll confirm by phone/email

Choose a day
Choose a time (11:30–15:30)
Guide progress0%
System guides · Mobile employer guide

Pay a worker or freelancer · straight from your phone

No computer nearby? No problem. The NETO system works fully in your phone's browser: log in, open a casual-worker payment calculation or send a payment request to a freelancer, produce the documents and submit with your signature · in six short steps, with real phone screenshots.

Let's start · step 1
Manpower licence No. 1565 Ministry of Labor supervision No company or withholding file needed
AI summary · the guide in 30 seconds
  • What this is: the NETO employer flow, entirely on a phone · log in, choose a payment track and pay a worker or freelancer, with NETO as the formal employer under manpower licence No. 1565.
  • Step 1: log in from the phone browser with your phone number and password and tap Log In as an Employer.
  • Step 2: the Salary and Payments home screen explains the tracks: casual workers, permanent employees and payment requests to freelancers.
  • Step 3: New Calculation walks you through the worker's details, salary data, travel and bonuses · then shows the costs, payslip and cost invoice. Nothing is binding until final approval.
  • Step 4: Send Invitation to Freelancer generates a payment request from the freelancer's name, phone, email and work details.
  • Step 5: the final calculation shows the full cost and produces the documents · invoice simulation, cost report, payslip simulation and engagement agreement, each with a Send button to your email.
  • Step 6: Final Approval opens the employer statement with an on-screen signature pad · the signature is what submits the transaction.
  • Cost and trust: NETO's fee is 5% before VAT. Source: licence No. 1565 details and verification.
1
Step 1 of 6

Log in from your phone

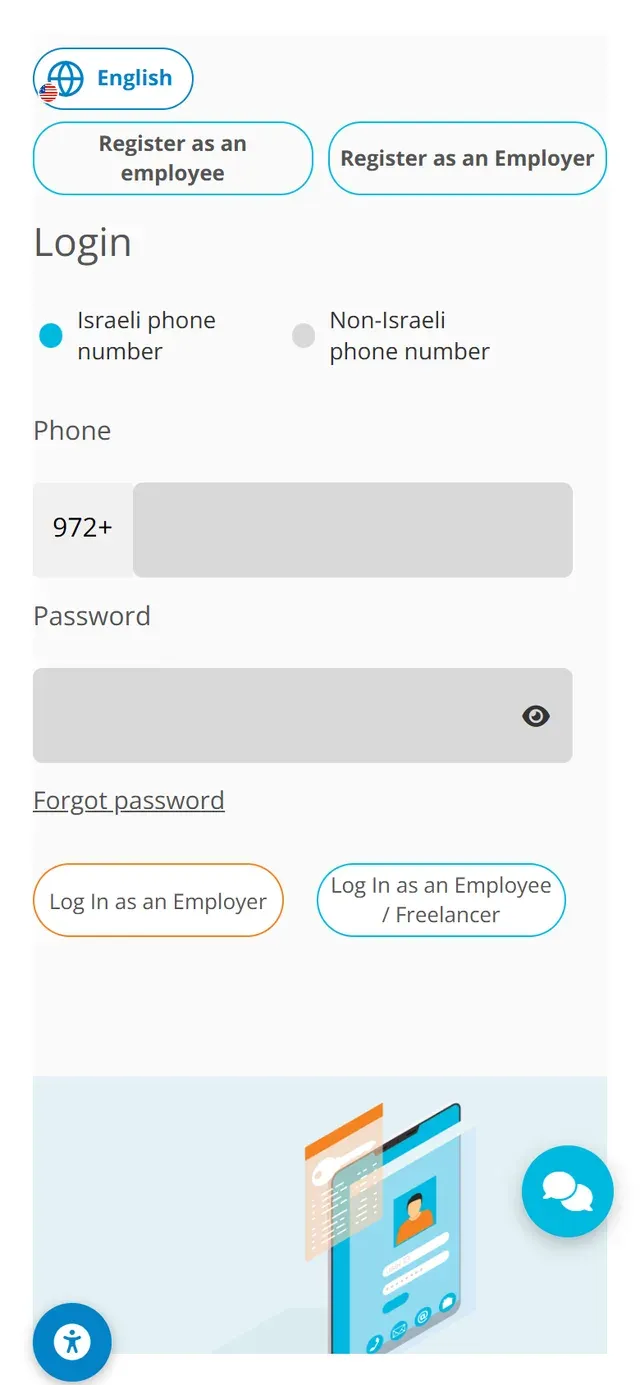
Open the NETO.LIVE login screen in your phone's browser. Keep "Israeli phone number" selected (or switch to "Non-Israeli phone number"), enter your phone and password and tap the orange Log In as an Employer button.

Good to know: the language button at the top switches the interface language, and "Forgot password" resets your password by message. First time here? Use the "Register as an Employer" button on the same screen.
Step 1 · the NETO login screen on a phone, with Log In as an Employer highlighted
2
Step 2 of 6

Home screen · Salary and Payments

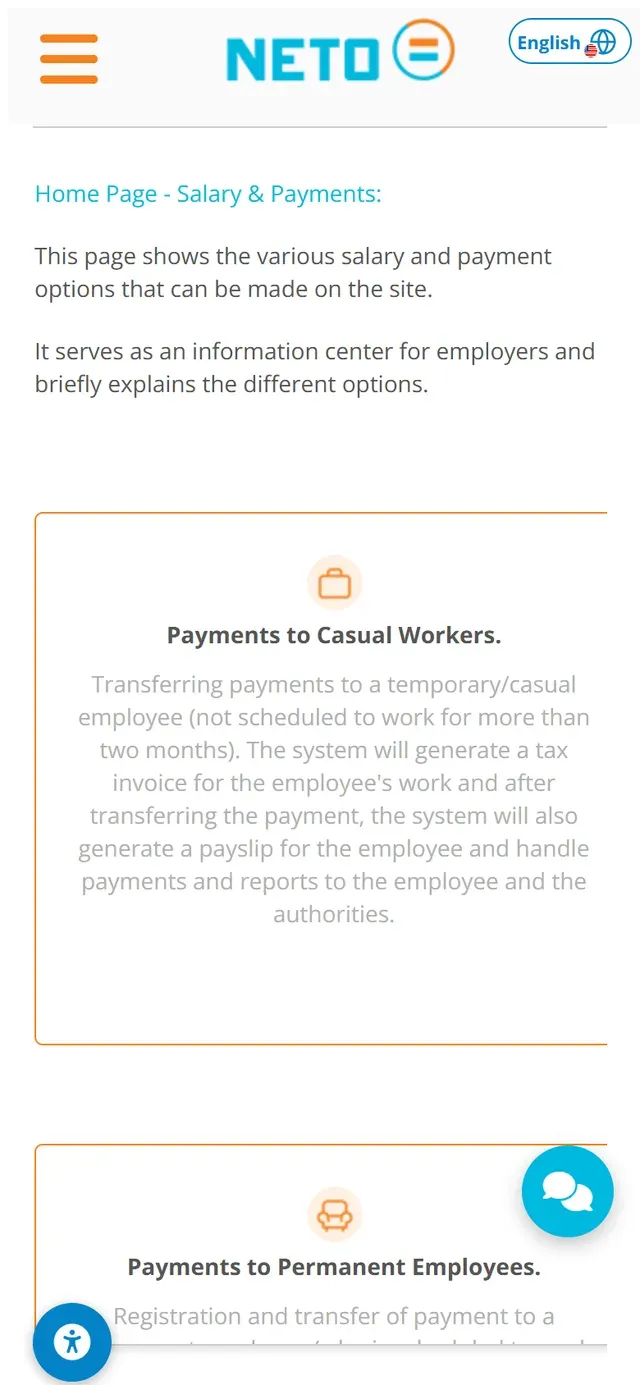
After logging in you land on the Salary and Payments home screen · an information center that briefly explains every payment option in the system: Payments to Casual Workers, Payments to Permanent Employees and Sending a Payment Request to a Freelancer.

Good to know: a casual worker is someone not scheduled to work for more than two months; a permanent employee also gets attendance reporting and an employment agreement. In every track, the tax invoice reaches you right after the payment is transferred.
Step 2 · the Salary and Payments home screen on a phone, with the payment-track cards
3
Step 3 of 6

Casual-worker payment · New Calculation

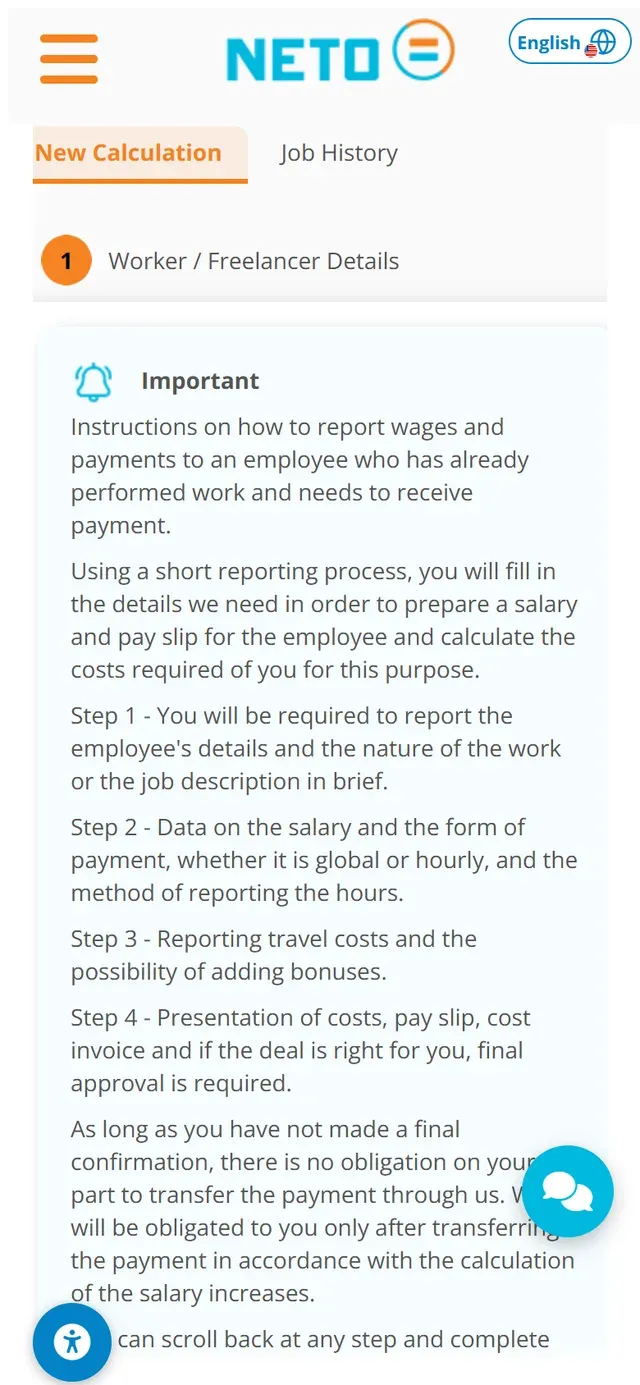
Open the New Calculation tab (Job History sits next to it). The screen explains the short reporting process: the worker's details and the nature of the work, the salary data (global or hourly) and how hours are reported, travel costs and bonuses, and finally the costs, payslip and cost invoice for approval.

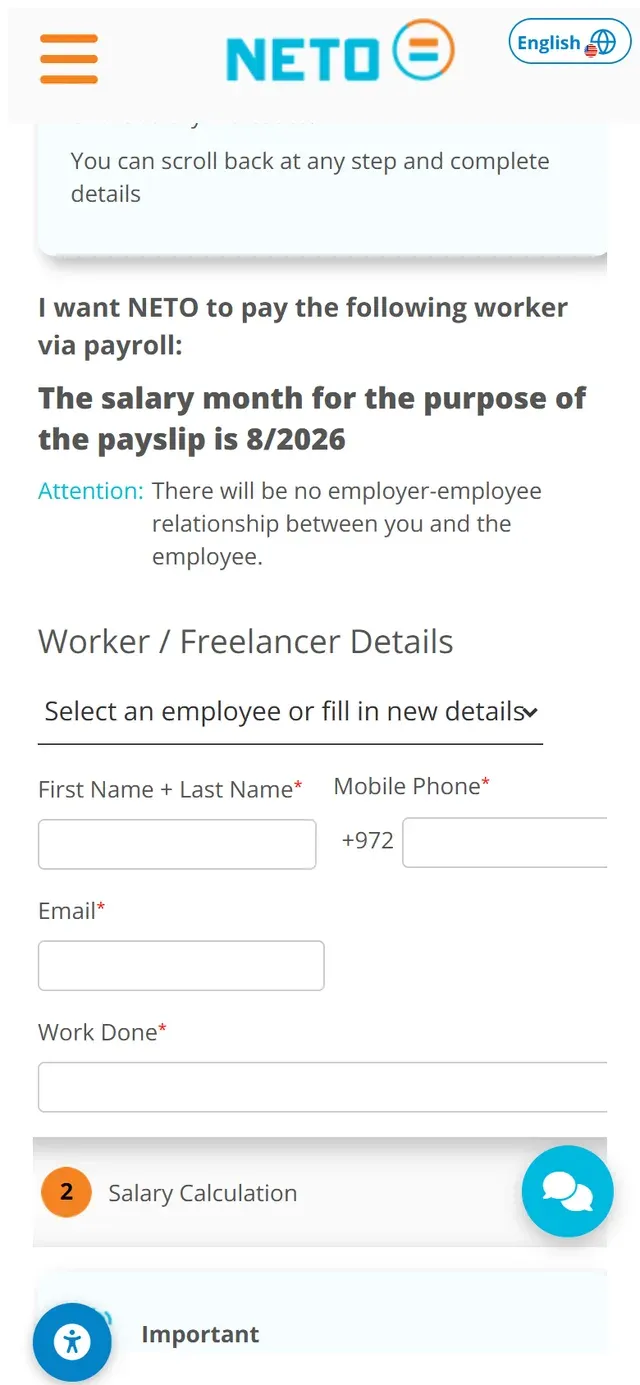
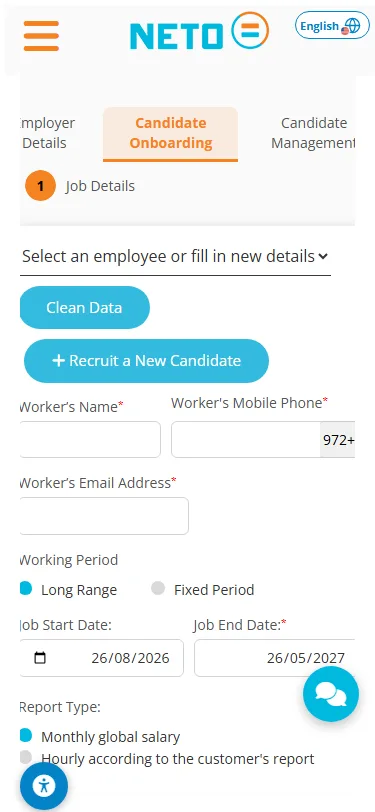
Scroll down to the form: the system states the salary month for the payslip, then asks for the worker's first and last name, mobile phone, email and the work done · and moves on to section 2, Salary Calculation.

Good to know: as long as you have not given final confirmation, nothing is binding · you can scroll back at any step and complete details. Note: in this track there is no employer-employee relationship between you and the worker.
Step 3 · the New Calculation tab on a phone with the four-part reporting process explained
Step 3 · the worker and freelancer details form on a phone: name, phone, email and work done
4
Step 4 of 6

Send a payment request to a freelancer

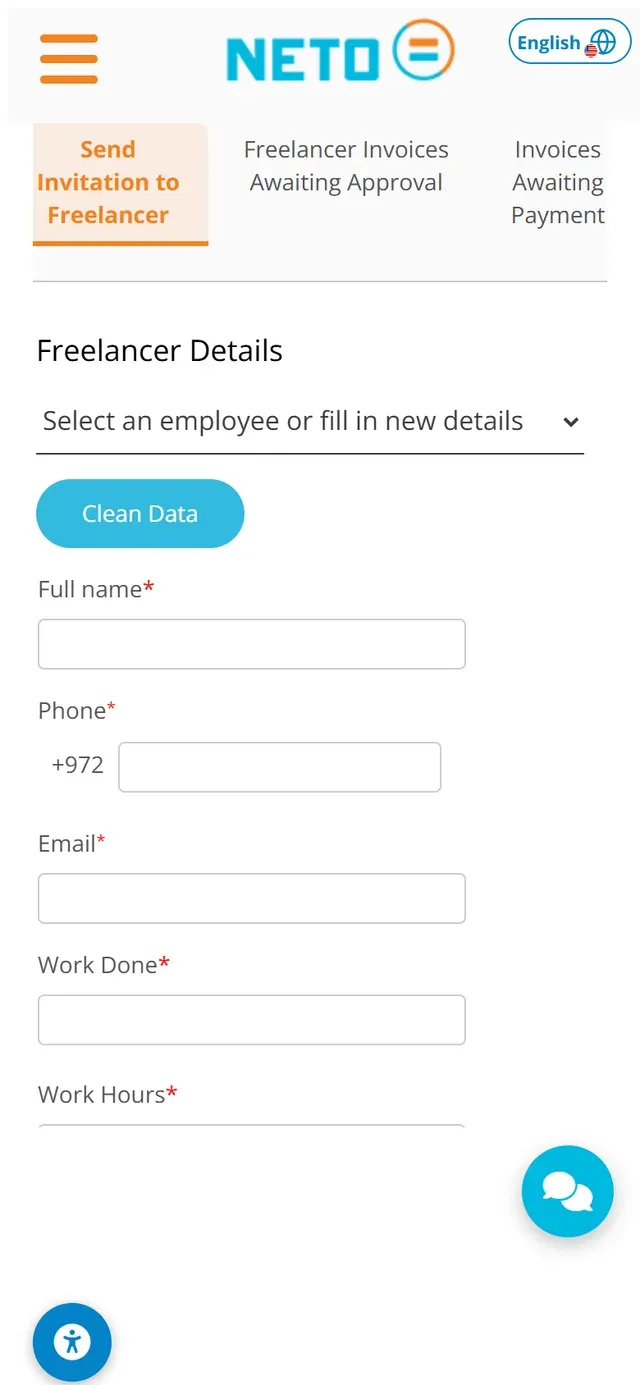
Worked with a freelancer who has no registered business? In the Send Invitation to Freelancer tab, pick an existing contact or fill in new details: full name, phone, email, the work done and the work hours. The system generates a payment request and asks the freelancer to register and provide their details in order to receive a payslip from NETO.

Good to know: the tabs next to it keep the full picture on your phone · Freelancer Invoices Awaiting Approval and Invoices Awaiting Payment. The Clean Data button clears the form for a new request.
Step 4 · the Send Invitation to Freelancer form on a phone: full name, phone, email, work done and work hours
5
Step 5 of 6

Documents and final calculation

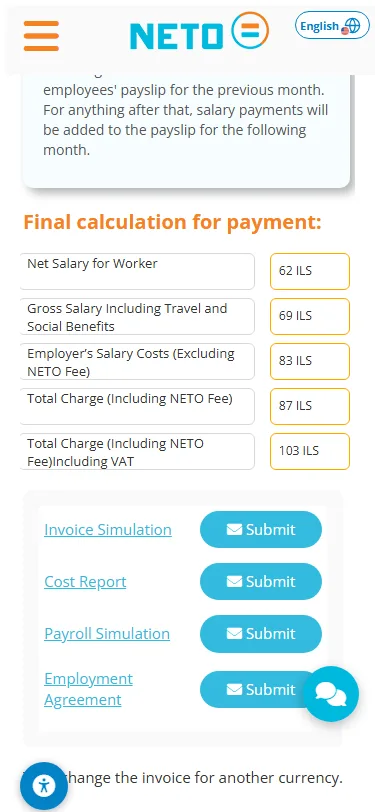
Continuing the casual-worker calculation from step 3: after the worker's details, the salary data, travel and bonuses, the system shows the full calculation transparently · the net salary for the worker, the gross including travel and social benefits, the employer costs, and the total charge including the NETO fee and VAT.

From the same screen you can produce four documents · an invoice simulation, a cost report, a payslip simulation and the engagement agreement · and every document has a Send button that delivers it to your email.

Good to know: until the final approval, nothing is binding and the transaction shows as pending. Payments received by the 7th of the month are included in the previous month's payslip.

The documents · what you can produce

  • Invoice simulation · the expected tax invoice
  • Cost report · the full employment-cost breakdown
  • Payslip simulation · what the worker will receive
  • Engagement agreement · opens as a signature dialog
  • A Send button on every document delivers it to your email
6
Step 6 of 6

Employer statement and signature · what submits the job

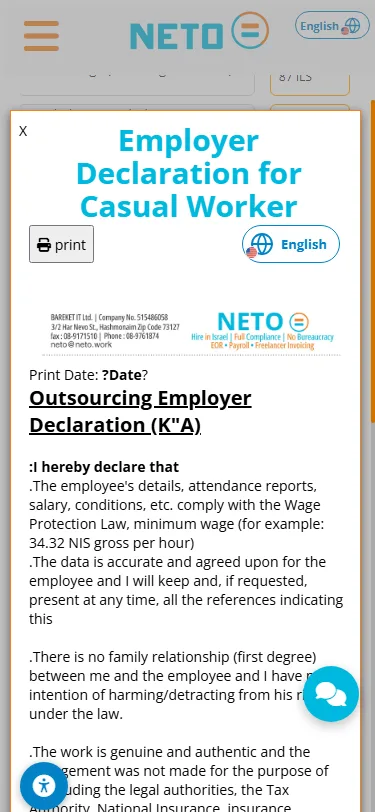
Tap Final Approval · and the employer statement opens: a short legal document with the employer's and worker's details, confirming that the job details are accurate and that the worker is paid after the NETO invoice is settled. At the bottom there is a marked signature area · and signing on screen, right on your phone, is what actually submits the transaction.

Good to know: you can print the statement with the Print button at the top of the dialog. As long as you have not signed, the transaction remains a draft · and you can return to it later.

The final approval · the short version

  • Tap Final Approval · the employer statement opens
  • A short legal declaration with the employer's and worker's details
  • Sign inside the marked signature area, right on the screen
  • The signature is what submits the transaction · until then it stays a draft

Prefer to watch it?

A short vertical video made for your phone.

Related guides · where to go from here

Frequently asked questions from employers

Can I do all of this on a desktop computer too?
Yes. The system works the same in a desktop browser, with more room on screen. The full desktop walkthrough is in the NETO employer guide.
Do I need a registered company or a withholding file to pay through NETO?
No. NETO is the formal employer under manpower licence No. 1565, issues the payslip and handles the payments and reports to the worker and the authorities. You only register as an employer and pay against a tax invoice. Licence details and verification.
What is the difference between a casual-worker payment and a payment request to a freelancer?
A casual-worker payment reports work that was already performed: the system prepares a payslip for the worker and a tax invoice for you. A payment request to a freelancer sends the freelancer an invitation for the amount you want on the invoice · the system asks them to register and provide their details in order to receive a payslip from NETO.
What does the service cost?
NETO's fee is 5% before VAT. The calculation screen shows you the full employment cost, the payslip and the cost invoice before you give final approval · so there are no surprises.

Summary · the whole process in six lines

  1. Log in from your phone's browser and tap Log In as an Employer.
  2. The Salary and Payments home screen explains the payment tracks.
  3. New Calculation prepares a casual-worker payment · details, salary, travel, approval.
  4. Send Invitation to Freelancer generates a payment request for a freelancer with no business.
  5. The final calculation produces the documents · invoice simulation, cost report, payslip simulation and agreement.
  6. The employer statement and your on-screen signature are what submit the job.

Ready to pay your first worker from the phone? Registration takes a few minutes, and the NETO support team walks you through if anything is unclear.

Stuck? Have a question? We are here

The NETO support team walks you through every step · by phone, on WhatsApp or through the smart assistant in the corner of the screen.

About this guide: written by the NETO team, led by Izhar Cohen, founder of NETO (Net for Life Ltd.) · manpower licence No. 1565 · operating since 2016. Last updated: 12 Aug 2026.
About the author
Yizhar CohenYC
Yizhar CohenEntrepreneur · CEO and Founding Partner at NETO

I founded NETO to turn complex employment and payment processes into something simple, clear and legal for everyone. Good service starts with human understanding, combined with smart technology and personal attention.

Connect on LinkedIn
Have a question? Let's talk.
Topics